Blog post 9: Building my first simple circuit

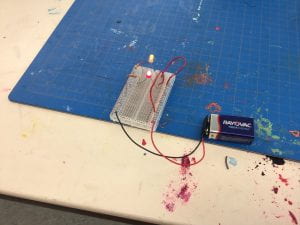
In this post I will be talking process behind building my first simple circuit, Below is a picture of the product:

First we collected our materials, and that consisted of the breadboard, the led lights, the wires, the battery, the clip that attaches to the battery (with wires attached to the clip), and the resistors. The first step to making the circuit was to attach the clip to the battery. Then you had to attach the red wire to a positive column and attach the black wire to a negative column on the opposite side of the breadboard. Next, you used your wire cutter to slice the outer plastic of of a red wire (4 inches long on each side of the wire). Those ends without the plastic layer will be used to stick in the breadboard. Next, you place your led light in the breadboard by placing the shorter leg on the side with the negative column on the right side. Then you place the longer leg in the same row as the shorter leg but on the side of the board. Next, you take the wire (that you sliced the outer plastic off) and you stick one end of the wire in the positive column and the other in the same row as your led light. Finally, you take one resistor and attaching side of  it to the negative column, and attach the another side to the same row as your led light. Finally, your led light will light up. You can repeat that process to make a second led light light up.

Soon, we will be making more advanced circuits and I can’t wait to learn more!

Technology behind Hydroelectric Energy

For this weeks blog post I will be talking about the technology behind Hydro Electric energy. I got my inspiration for this post from our renewable energy unit in science.

The technology behind this form of energy is actually quite simple. As you open the gates of a dam, water falls onto a turbine that spins and powers a generator. The generator converts the mechanical energy into electrical energy (electricity). The turbine is used to create many sources of renewable energy and it is crucial to the success of creating the sources of energy. This system is renewable because water is constantly cycled in our world (it never runs out).  It also doesn’t pollute the environment, so it is much better for the environment than fossil fuels.

Overall, I think it is very interesting to learn about the technology behind many things, and I really enjoyed creating this blog post. I think Hydroelectric energy is a great source of energy and has a lot of potential to be even better than it is currently.


Week 7 Blog Post: Technology Behind Solar Pannels

For this weeks blog post I will be writing about the technology behind solar panels. I thought of this idea because we are currently learning about renewable energy in science, and I thought that I could use information that I have learned about solar panels to help me with this blog post.

The technology behind a solar panel is actually quite simple. After sunlight falls on a layer of semiconductor, it moves electrons causing an electrical current. The electrical current can then be used for energy. The more sunlight there is, the more energy the machine can produce. This is all being done while not polluting! And it’s renewable! It’s honestly an amazing invention that will help this world so much going forward.

In conclusion, a solar panel’s technology is absolutely amazing since it takes a renewable source of energy (the sun) and can make a lot of energy. It was great to be able to write about something I have learned about in a blog post, and I look forward to the next time.

Week 6 Technology Post: Building A Mechanical Switch

Last week I made a mechanical switch in technology, and I will be writing about the process behind the project. After I finished the project on Thursday of last week, I immediately knew it would be a great blog post to write about.

The process included three steps. First, you had to gather all the pieces you need based on the switch you making. Second, you had to wax the teeth of the pieces, and assemble all the pieces together to make a functional mechanical switch. And lastly, you could attach the final product to your light switch, and then submit a video of it working. Or you could decide to just submit a video of it working without it being on the light switch.

The first pieces I assembled (by gluing) after waxing were the pin and the 2 driver gears. Right after that I put the bar onto the other side of the driver gears. Next, I attached another pin to 2 pinion gears. Then I put the dimmer racks on to the slider. Now I started to assemble things together by attaching them to the sides. First, I put the driver gear (along with the other pieces assembled with it) into the top whole of the slide. Then I put the pinion gears (that were on the pin) into the bottom whole. I did this process to both side pieces (right and left). Lastly, I lined up the slider (with the dimmer racks attached) with the edge of a toggle plate, and then stuck the sides (with everything else attached) into the wholes of the toggle plate. And now I hade a finished, functional mechanical switch!

Technology Behind Washing Machines

For this weeks blog post I will be writing about washing machines. I got inspiration for this after I was using the washing machine to clean my family’s clothes. Then the idea popped in my head! I thought “Hey! That would be a great idea for a blog post!” So, I went to my desk and started working.

The technology behind a washing machine has multiple aspects to it. During the wash cycle, a large piece of plastic spins around the clothes exposing every angle of the clothes to the water. The large piece of plastic is powered with by an electric motor as well as the water system. The water system works by having water stored form pipes, and being pushed out after the electric motor turns the inner drum that causes the water to come out of the outer drum. A fun fact about the technology is that the machine is made up of two simple machines. They are a lever, and a wheel and axle.

It was fun to understand the technology behind a washing machine, and I am excited to learn more about other technology soon.

Technology week 4: Crank A

For this weeks blog post I will be writing about what I did in tech class this week. This week, I built a paper crank. I’m going to walk you through the process! First, I cut out all the materials on the paper that we were provided with and used my slice cutter to cut out smaller pieces. Next, I assembled the box where the crank would sit in by folding with rulers and gluing different parts together. Right after that I created the smaller pieces for the crank by folding and gluing them. Then I glued all the smaller pieces, besides two pieces that got glued together, and put them through the whole of a bigger part of the crank. Next, I glued the two pieces that were already glued together to the pieces that went through the whole of a bigger piece. Now it was time to put it in the box! I put the big piece through a square at the top of the box and the two sides that stuck out from it in two opposite circles. For the second to last step, I put two circular pieces around the ends of the axles to help prevent them from moving around incorrectly. Lastly, I glued a wheel on the axle’s right side that would allow you to spin the crank. Overall, I had a really fun time doing this project. It was much quicker to do than the last project we did (cams) because I already had similar experiences. I hope to do more fun projects like this soon.

Technology Behind Light Bulbs

For this weeks tech blog post I decided to write about the technology behind light bulbs. My inspiration for this was looking for things around my house that would be interesting to write about, soon enough I saw a light bulb and I thought this weeks blog post would be a perfect opportunity to learn more about them. The light bulb is actually very simple, surprisingly, you simply run an electric current through a thin filament, which causes it to get hot. Hot objects emit light , so the bulb glows. Simple, right! A fun fact about light bulbs is that they use a screw to be able to screw into an area. Another cool fact is that the lightbulb was created in 1802 by Humphry Davy and was originally called the Electric Arc Lamp. Moving on, you may notice that every light bulb has something that controls it, that is normally a light switch. A light switch is actually a first class lever that either turns the light on or off. The light switch works by having you push on the switch to the on position to light the bulb, the gate snaps close, completes the circuit, and allows power to flow through the switch and onward to the light fixture. When you flip the switch to the off position, the gateway opens up, interrupting the flow of power to the light fixture. That’s it for this weeks blog post, I am excited to keep expanding my knowledge about technology soon.

Technology Behind Electric Cars

In this weeks blog post I am going to be talking about the technology behind an electric car. Electric cars are a relatively new invention and they are very fascinating to me. I took this blog post as an opportunity to do research about this amazing invention us humans have been able to create. An electric car functions by plugging into to a charge point and taking electricity from the grid. They store this electricity in rechargeable batteries that power an electric motor, which turn the wheels causing the car to move. A fun fact is that electric cars accelerate faster than vehicles with traditional fuel engines so it feels lighter to drive than vehicles with fuel engines. Electric cars include all 6 simple machines (lever, wheel and axle, pulley, wedge, screw, and inclined plane.) It was really interesting to learn about this and I am excited to learn about more topics soon.

Microwave technology connection

I’m not exactly a chef, but I do know that microwaves are very useful. I often use it to make my favorite foods, and I’ve always wondered how the technology actually works. So I decided to use this blog post as an opportunity to do some research, I learned that microwaves are an electric oven that heats and cooks food by exposing it to electromagnetic radiation in the microwave frequency range. This basically means that they use oven technology that exposes your food to radiation in the microwaves range to put it more simply. This causes your food to heat. Two interesting fact are, the reason the microwave constantly spins your food around is to evenly distribute heat across your food, and the microwave is actually made up of two simple machines, a lever and a wheel and axle. I found these new facts that are very fascinating and I hope to learn more about other topics soon. Thanks for reading!

Swift Playgrounds: Writing Our Own Code

This week we had to create our own code in Swift Playgrounds and then we had to write a blog post about it, this is mine. As you can see above I have annotated the picture of my code and I will be talking about it. I tried to create a system that had a conversation with you about your favorite sport, and it was successful! At first my program asks, “What is your favorite sport?” Then you respond, and it says, “ I like (your favorite sport.)” Then it asks you, “ Why do you like it?” You respond and it responds, “Same with me, (reason why you like it.)” It then asks, “Are you on a team?” You respond, and then it responds, “Me aswell, (your answer.)” Not much was challenging except sometimes there was errors in your code (you couldn’t do what you wanted) and it was hard to work around it. I didn’t find it difficult for the most part though. I thought it was very interesting to program something to have a normal human like conversation.