Coronavirus Outbreak

Scientists have determined that the Coronavirus first began spreading to people at the Huanan Seafood Wholesale Market in Wuhan, China (Wuhan is the capital of Hubei). This market sold live animals and fresh meat, and the virus spread from the animals to the people. Some examples of the wild animals that were sold are wolf pups, foxes, rats, peacocks, crocodiles, giant salamanders, snakes, porcupines and camel meat. Unfortunately, it is the Lunar New Year Holiday. As a result, lots of people are traveling in and out of the area coronavirus was found in. Therefore, the virus has the ability to spread into many other distant places that would not have come in contact with it otherwise. China decided to extend the holiday in order to “reduce mass gatherings” and “block the spread of the epidemic.” According to the National Health Commission, 2,744 cases had been confirmed by midnight on Sunday. Due to the growing number of people affected by coronavirus, the city is building two more hospitals. Hong Kong announced that they would not be allowing anyone to enter the country’s Hubei province starting Monday as an attempt to isolate coronavirus.

I believe that coronavirus could become a lot more threatening than it already is because it has the ability to spread through people quickly. The virus is contagious, and a lot of people are not being careful. For instance, they are not wearing masks when around an affected area, washing their hands often, avoiding touching their face, and staying away from people who are carrying it. I think it was the right decision to almost completely isolate Hubei, for coronavirus has affected and killed many. If it is not stopped or contained immediately, it could easily get out of hand. For the people who are affected by the virus because of their close proximity to the market, they will soon be able to go to the new hospitals. I believe that it is important for doctors to work and look for vaccines, treatments, and cures as fast as possible because coronavirus has proved to be dangerous, contagious, and even deadly.

Tech 7 #2

Currently, I have glued together all six wooden pieces of my box. The pieces fit together generally. Although, some pieces are not exact and need to be sanded to perfect sizes. I need to use a belt sander (an electric power sander) to sand down many of the sides of my whole box. These parts can be sanded easily to an even level.

It took me a lot of sanding before my pieces were ready to be glued. First, I glued together my front, back, and sides. I wet my fingers before smudging a thin layer of wood glue on all of the ends. After putting together these four pieces with their glue, I could slightly adjust them. I then put a rubber band around them to hold them in place. Then, I put my glued pieces inside of a vice to hold its shape while the glue dried. Two pieces of cardboard were placed between the sides of my wooden frame and the vice. This helps to protect my project from dents, marks, or scratches.

The glueing process took me two days in total. The first day consisted of glueing the frame, and the frame dried over night. The next day, I glued on the top and bottom. This process was very similar to the first glueing process previously described. After smudging on a thin layer of glue on the top, I had a few seconds to adjust my placement – it was fine if the wood was not perfectly sized, for it would be sanded down. I flipped over my project to glue on the bottom where I did the same thing. Finally, I put on rubber bands and placed it in-between the cardboard within the vice. My box dried overnight, and I am now ready to sand down all six sides.

Tech 7 #1

The cardboard model helped my understand the dimensions of my box. It also helped my practice making my measurements. Rip cutting wood is similar to using the scroll saw, so I did not have to be incredibly wary of making mistakes. I was comfortable using each tool. Simple tools such as rulers, try-squares, and sanding boards were extremely easy to learn and use. On the other hand, using power tools such as the scroll saw, box saw, and band saw were a title more difficult. I needed to learn how to use them, and I had to be careful when the tools were on.

Here is a picture of my cardboard box model:

My box does not ave hinges, so the lid comes off directly.

When I was measuring, I made many small mistakes. For example, I measured some of my marks a millimeter off. When my teacher checked over my measurements, I had to redo a few of my lines. After measuring, I cut my wood. The scroll saw was left at an angle. As a result, when I went to use it, I could not get the saw parallel to my line. This caused one or two of my pieces to be crooked. For me, it was satisfying when some of my pieces fit perfectly together. Although, it was frustrating when many of my pieces were slightly off. I needed to sand them and, in some cases, saw off bits.

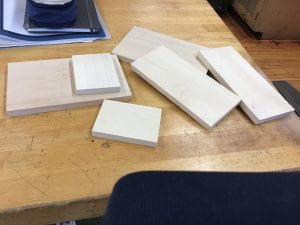
Here its a photo of my current progress:

I measured the height of my two side pieces to be five inches, but they are only three inches high. As a result, I have to rip cut them again.

In the next six months, I will continue to sand and cut my pieces until they fit together perfectly. Then, I will glue together my pieces and sand all my surfaces again. I want my box to be stained using the lightest finishing, and decorated with two hearts engraved on the lid. The lid will not have hinges.

Drafting My Box

First, I sketched what I wanted my box to look like. I came up with many ideas, so I changed my sketch multiple times. In the end, I decided to make a rectangular box three inches high. The lid of the box comes off, for there will not be any hinges. The wood will be stained the lightest finishing, and the inside of the box will not be lined. I am not sure what my box will contain.

Next, I made a model of my box out of cardboard. The dimensions were not exact, but it helped me understand what I needed to make out of wood. When In make my final wooden box, the pieces need to be cut to the perfect size. To make the cardboard box, I used a ruler to draw my pieces in cardboard. Those pieces were cut using a scroll saw. Finally, I assembled my cardboard box using masking tape.


On the lid of my box, I plan to carve two hearts, one small and one big.

Safety in Tech 7

Similar to technology class in 6th grade, we should not touch the tools and machines unless we are given instructions to. Although, this year some of the more complex and dangerous tools can only be used with supervision. For example, the electric saws are tools that we may need supervision in order to use. There are many more sharp and difficult to use tools than last year. Unlike tech 6, we will be working with wood to create small wooden boxes. When cutting wood, it is necessary to wear safety goggles. We wore safety goggles last year, but only while soldering. This quarter they are being used to protect our eyes from sawdust. Sawdust is the dust of wood that comes off when wood is being sawed.


It will be easy for me to remember that some new tools need supervision and instruction, but it may be hard to remember that we need supervision with some of the familiar tools that we worked with last year. For instance, I may forget that I can not jump straight to the soldering iron without permission.

Drilling

The drills are very useful because they can drill holes in hard materials such as pvc pipe. I drilled holes for my switch and LED light in the pvc pipe for my flashlight.

First, you mark where you want to drill the hole. There are two drills; one for drilling holes for LED lights, and one for drilling holes for switches. You place the pipe underneath the drill and tighten your pipe so that it can not slip. Adjust the holder so that your drill mark is centered to where he drill is.

Then, you use the lever to push the drill down while off. If the drill hits the mark where you want the hole, lift the drill back up using the lever. Finally, hit the on switch and press the lever down. Allow the drill to do all the way through your top layer of pipe, but do not drill to the ground.

Make sure you put your hair up and wear safety glasses!

Flashlights

There were many steps when creating our flashlights. First we diagrammed our flashlights using grid paper. Each grid is equal to one half of on inch. We had to measure all of our necessary parts and pipes, then sketch them in proportion on our diagram. Next, we labeled the width and length of our diagrammed pieces.

Then, we sketched our battery, switch, and three wires into out diagramm, within the parts. Two wires were the same color, one was different. I had two black and one red wire. The red is positive, while the black is negative. Then, we used measuring wires to determine the length of of necessary wires.

The next step is cutting your pvc pipes to the desired length. You mark where you want to cut, then place the pipe in the holder and tighten the holder. Finally, move the saw back and forth until you reach the bottom of the pipe.

Then, put your circuit pieces together and solder. Add your pipe pieces together and decorate!

Soldering

A soldering iron can heat up to about 800 degrees. Soldering irons are used to melt solder and glue metal, copper, silver, and many more materials together. Solder is an incredibly plyable type of metal, and it has the lowest melting point. This makes it ideal to melt as metal glue.

A soldering iron is held like a pencil. The “third arms” are two bendable sticks on a stand with clips at the ends. They are used to hold the material you are soldering, while you hold the solder and soldering iron. The third arms must hold the two materials as close as possible until the are touching. You have to solder where the parts touch. Then, the soldering iron is held against the area you want to solder for 15 seconds. Next, take a piece of solder and press it to the spot you want to solder while still holding the soldering iron on the same spot. As a result, the soldering iron, solder and two materials will all be touching in one spot. Wait until th solder melts, sealing the two materials together.

Finally, clean off the soldering iron and wipe you hardened solder with a cold, wet sponge. This should cool down your solder. make sure to put your hair up and wear safety glasses when soldering!

Self Driving Cars

Self driving cars are the newest additions to modern technology. Although, many accidents have occured when people were driving self driving cars. These cars need to be improved upon in order to become legal everywhere. Self driving cars are already legal in a few states, but only for testing purposes. Car companies and scientists all over the world are testing out new self driving car models that are more accurate.

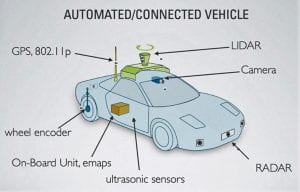
Self driving cars have a laser that spins in a 360 above the car. This laser takes in all of the objects, signals, and signs around the car. The technology within the car then interprets these signs. They understand street signs such as stop signs and stop lights. They also understand the cars, trucks, bikes and other transportation devices that are traveling around the car. This allows the self driving car to avoid any accidents. The laser can also interpret where bridges and construction sights are. This allows the car to avoid the comotion no matter how recent the construction was started.

The first company to create a self driving car wasn’t Tesla, but Google. Google created a semi-autonomous self driving car. This means that the “driver” will occasionally need to take charge, for the car is only part self driving. When driving a self driving car, you still need to pay attention to the road. This is incase the car malfunctions and requires you to take charge.


Nicola Tesla

Nicola thought that he could transmit wireless energy throughout the world using giant Tesla Coils. He was in the middle of building the first giant Tesla Coil funded by J.P Morgan, when another man successfully transmitted wireless energy across the Pacific. J.P Morgan stopped funding Nicola Tesla’s experiments. Many years later, the giant Tesla Coil was torn down.

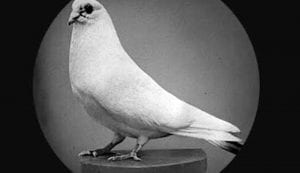
Nicola Tesla believed that his wife was a pigeon. He was practically insane when he became broke. Nicola began rescuing injured pigeons and nursing them back to health. His wife was one of the pigeons he rescued and bonded to. Tesla stayed in a small, crammed room in a hotel in New York. There, Nicola Tesla died.

Nicola Tesla was a mad scientist, but he was actually intelligent before he decided to rescue pigeons. Thomas Edison is said to have stolen Tesla’s idea for the lightbulb. Tesla and Edison were rivals for a very long time. Tesla worked for Edison, but Edison refused to give Tesla a raise even though he was providing him with great ideas. Tesla quit and began tinkering around with his own ideas. He came with the idea of direct current. Although, Edison came up with the idea of alternate current. Edison cruelly electrified elephants with Tesla’s direct current. He shared this with the public in an effort to persuade communities to install AC, and not DC. Although, Tesla’s DC was more effective and more affordable.