In tech, we discussed the story of the soccer team that got stuck in a cave. After we talked about that story, it lead us to our new project, which was to build a waterproof flashlight. I started brainstorming ideas for my flashlight. For my flashlight, I want to use pipes, connectors, a switch, and a light. A connector is something that connects the pipes together. I’m so excited to build my flashlight.
Month: December 2019
Tech #6 – Switches
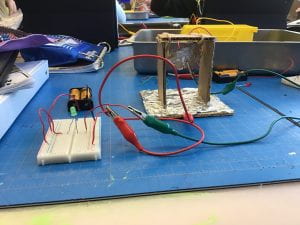
In tech, we built switches. The goal was to make a switch that lights up an LED light. For my switch, I used rubber bands, cardboard, and tinfoil. I used hot glue to stick everything together. The tinfoil was the most important part of the switch because that’s what would light up the LED light. When you touch the two pieces of tinfoil together, the LED light lights up. This was really fun to make.
Tech #5 – Soldering our Designs

I have finally finished my pendant. It took a lot of time and effort, but I’m very proud of myself for completing it. During my last blog post, I was still working on the design for my pendant. I designed it by bending metal wires to make it look like my design. After I finished doing that, I had to solder it together. I soldered it by using a soldering iron and a soldering wire. A soldering iron is an iron that’s very hot, and is used to connect the wires all together. A soldering wire is the wire that is melted by the soldering iron. The soldering wire acts like a glue that sticks all the wires together.
First, I cleaned my soldering iron. Then, I let the soldering iron touch the place where I wanted the wires to connect. I did that for ten seconds to heat up the soldering iron. Next, I got my soldering wire and put it in between the two wires I wanted to connect. After that, I put the soldering iron right on top of the soldering wire, which made the soldering wire melt. After a few seconds, the melted wire hardened. I repeated these steps until all of my pieces were connected. When the pendant cools down, I carefully removed the pendant from the piece of tape it was on. After that step, I was finally finished with my pendant. My pendant didn’t come out perfect, but this was so fun to do and I hope I get a chance to do it again.
Tech #4 – Pendant Designing

In tech, we started working on our actual designs fro our pendants. Before we started making the pendants, we had to brainstorm designs on paper. The design that we chose is supposed to act as a guide. You make the design with metal wires by using a special type of tape and you stick it on top of your design. Next, you peel off the other side of the tape and stick the pendant onto it. Then, start making the design for you pendant.
For the pendant design, you get a metal wire and start shaping the wire so it eventually looks like the design you made. When you have the pieces of your design, you’re supposed to stick it on the tape where the inside of the pendant is. When the pendant is complete, you solder all the pieces together. I’m not up to that part yet, but I’m still on the designing part. This is really fun and I’m so excited to solder all of the pieces together.
Tech #3 – Soldering

For the past few days, we’ve been working on something called soldering. Soldering is a process when two or more items are attached by melting the items together. In this case, we’re using metal wires. In class, we are working on making pendants.
The first step was to brainstorm a couple of ideas for our pendant design. It was a little hard because we were only allowed to use five metal wires for our design. Then, we had to pick one design to use for our pendants. After a lot of thinking, I finally settled on one design. After we decided on which design we were going to do on the pendant, we had to make the outside of the pendant, but not the actual design yet.
We made the outside of the pendant by starting in the middle of the wire and wrapping the wire around the wooden stick, which would turn the wire into a circle. The reason why we started wrapping the wire in the middle is because we needed the two sides of the wire to tighten the circle. We had to twist the two wires three times, and when the outside of the pendant was tight enough, the outside of the pendant was complete. This was really fun and I’m so excited to make the actual design.
Recent Comments