How It’s Made – 7th Grade Tech

For the past couple of weeks, as well as working on our projects, we’ve been learning about physical properties.

After watching a video on how marbles are made from the “How It’s Made” YouTube channel, I observed a couple of things about glass’s ductility and moldability and how those properties can be affected by temperature.

To make a marble, you need to melt glass. I observed that when the glass came straight out of the furnace, it was very ductile. You could apply tensile strength to it and it would deform, it would stretch, but it wouldn’t break. I also observed that it could be easily molded into a shape that would hold.

This video not only taught me how marbles are made, or how glass is very ductile and moldable, but also how a physical property of an object can change depending on the temperature. When glass is not melted, it’s not ductile or moldable at all. However, when it is melted, that’s a different story.

Building My Drawer – 7th Grade Tech

Earlier this week, we began to build our projects! We were given bags with all the necessary tools, opened up our 3D models on our iPads, and then got to work!

I was handed 3 planks of balsa wood to start off. First, to make the bottom face of the drawer, I cut a 10 and 1/2 inch piece from one of the planks using the mini saw because I was cutting across the grain. To double layer it, I cut another 10 and 1/2 inch piece from the plank. Before gluing them together, I needed to make one of the 10 and 1/2 inch pieces 1/8 of an inch shorter in order to make the rabbet joint. Just as I was about to cut 1/8 of an inch off, the bell rang. That meant we had two minutes left, so we had to start cleaning up. We didn’t have much time to start building, but I think I made pretty good progress.

I can’t wait for tomorrow! We’ll probably continue!

3D Project Model – 7th Grade Tech

Last week, we made a 3D model of our projects on Tinkercad. It was a really cool experience!

Tinkercad is amazing! I was able to make the drawer exactly how I wanted it. My design had the same dimensions and everything. At first, I thought it was going to be pretty challenging, but it turned out, it’s not as hard as it seems. Anyone can design anything they want!

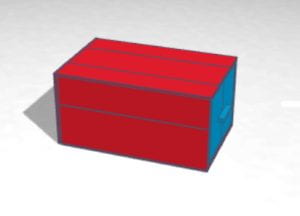
I started off using 4 boxes to make the bottom face of my outer box. I changed their length, width, and height to mimic the balsa wood planks. To make the rabbet joint, I took 2 of my planks and made them 1/8 of an inch shorter. Then I grouped the larger planks with the shorter ones. After that, I attached both groupings using the joint. I still wasn’t done with that face yet, though. I needed it to be 7 inches long. It was 6. So, I made one of the shorter planks another 1/8 of an inch shorter. I used 2 more boxes to make the 1 inch long grouping and made one of the planks 1/8 of an inch shorter. I then attached that new grouping with the other one. Now I finished that face! To make the top face, I just duplicated the bottom one and raised it 5 inches. To make the front, back, and sides, I used the same procedure, and then did the whole thing over again to make my inner box. Now it was time for the finishing touch. To make the handle, I used 1 more box, made it much thinner and longer, and then attached it to the front face of my inner box.

I loved using Tinkercad and thought it was a great way to plan out our projects, especially the joints. I’m looking forward to building my drawer after break!

Here is my design:

Project Diagram – 7th Grade Tech

Yesterday, we planned out our projects and made a diagram. Our projects have to be made out of balsa wood, so I chose to make a drawer. In the diagram, we have to include the dimensions, types of wood joints, and how many 36” long x 3” tall wood planks we’re planning on using.

My drawer is going to be 7” long, 10.5” wide, and 5” tall. I’m going to use rabbet joints, and I’m planning on using 7 planks of balsa wood.

Here is my project diagram:


Sawing – 7th Grade Tech

A little over a week ago, in tech, we used slice precision cutters to cut through balsa wood. You use them to cut with the grain. These tools don’t cut fully through the wood though, we’d have to snap the piece into two like a Kit Kat. This was just so that we learned how to use them.

Last Tuesday, we used mini saws instead of slice precision cutters. Unlike the slice precision cutters, these saws have over two hundred teeth, can cut fully through the wood, and you use them to cut against the grain. At first, I used the saw like a knife and pressed down on it, but when using this type of saw, you’re not supposed to do that. You move it back and forth, letting the teeth do the job. When I tried this, it was much easier and the saw cut through the wood smoothly.

I really liked testing these two tools out and I’m excited to start using them for projects!

Slice precision cutter:

Mini saw:

Timber Harvest – 7th Grade Tech

Back in 1947, we didn’t have the technology we have today. Many steps in the process of harvesting timber were done manually. In the second and third videos, which were about how it’s done currently, almost every step was accomplished using machines.

I learned a lot about redwood from the first video. I was surprised, I didn’t know that they’re so big, and that they can live for so many years! Coast redwood can live up to 2000 years, grow up to 300 feet, and have up to a 20 foot base! The video also mentions another type of redwood that’s bigger and can live even longer! Redwood trees are really incredible.

Something that I found interesting was that it looks like the types of trees we used changed over time. In the first video, redwood trees were used, but it looks like in the second and third videos, smaller and thinner types of trees were used.

These videos showed me the evolution of harvesting timber.

Computer Tech Post #7 – Game Design (LAST 6TH GRADE COMPUTER TECH BLOG POST)

For my game design project, I chose “Scrolling,” also known as the game called “Flappy Bird.” In my game, one has to control the sprite using the space bar and make sure not to touch the green bars. Along the way, through each of the four phases, one unlocks different sprites. You start off using the parrot, then the toucan, the owl, and then the dragon.

The hardest part in making my game was definitely the scoring. At first, I based the scoring using time. For example, wait 5 seconds and then add 1 to the score, but that didn’t work because over time, the score would get messed up. Then I realized that when the pair of green bars gets to the middle, where the sprite is, there 1 should be added to the score, (obviously if the sprite doesn’t touch the green bars). Once I tried that it worked, which is what I’m most proud of throughout the process of creating the game because I was able to get through it and solve the issue.

If I had more time, I would have probably made a maze game, but because of COVID-19 and because there’s only 4 more days of school, that isn’t possible.

SMS4CM2’s maze game I thought was very clever because what you need to do is go through the maze to a certain point, touch a green dot which opens up a gate, then go back up the way you came to the open gate, and then find your way to the finishing point, and you win! What I also liked about it is that there’s a timer. This way, even if we win, we can still be entertained by trying to beat our fastest time.

My favorite part about computer tech was using Scratch. I think I got much better at coding and got really creative with some projects. Before computer tech, I wasn’t very interested in coding, but now I really like it. It feels great when you finish a project you’ve been working long and hard on.

Doing work at home, at least for me, wasn’t bad at all. Of course it wasn’t the same, but it was still very productive. I learned a lot in computer tech and I think that if I were in school this quarter, it really wouldn’t have been much different. At home, there aren’t any friend distractions, which helped me focus on my work. Well, of course there’s also a lot of other distractions at home, but I don’t tend to get so distracted because I know the consequences. The hardest part about working from home was that when I wanted something to be clarified, and there wouldn’t be any zooms that day, I would have to email my teacher. Those questions can be easily answered in 1 second if we were in school, but they take much longer through email. That wasn’t a big deal, but I really didn’t have many problems with distance learning, working from home.

Computer tech was amazing this year and I’m looking forward to it in 7th grade!
Computer Tech Post #6 – Final Spreadsheet Lesson

Yesterday we were assigned our third and last spreadsheet lesson. What we have to do is add data to one of the google sheets that has a chosen topic. The topic that I chose out of the others was the NY Yankees’ and Mets’ home runs. I added a formula, function, and chart to it. The formula I made was to find the total home runs hit every year, and the function I made was to find the average home runs hit between the two teams every year. This was interesting because it seemed to me that the closer it is to modern day, the greater the total and average home runs got. The Mets were founded much later than the Yankees, so starting in 1962, there were two teams that made the total and average, not one. Although, also, as years passed by, the Yankees and Mets started hitting more home runs. in 1913, the Yankees only hit 8 home runs, but later in 2009 they hit 244! I think this is because one, today there are more games played, and two, the game was invented long ago, so it evolved and the way it’s played changed.

This is the chart made using Google Sheets based on the data collected:

(It might be hard to see)

Computer Tech Post #5 – Learn to Code: Conditional Code and Logical Operators

After completing the topics of Conditional Code and Logical Operators under Learn to Code 1, I didn’t find any puzzles especially hard. Some were a bit more challenging than others, but after about 3 tries or so, I was able to figure them out.

Conditional code and logical operators make code easier and also specify what you want Blu, Byte, or another character to do.

Conditional code is making your character follow a set of commands if a situation, or boolean, is true. (A situation and a boolean are the same). For example, if you want your character to collect a gem if they are on one, you’d use an ”if” block and code, “if isOnGem ( collectGem() )” If this situation is possibly false, you’d either add an “else if” statement or just an “else” statement. For example, ”if isOnGem ( collectGem ) else if isOnSwitch ( toggleSwitch() ) You’d add an “else if” statement when there are multiple possible situations, but if there is only one other possible situation, you’d just add an ”else” statement with a set of commands and no boolean. When using ”else if”, if the boolean you proposed is true, than your character would follow your set of commands. On the other hand, for just an ”else” statement, there is no boolean because there is no other possible outcome if the first boolean was false. For example, if you want your character to move forward if there is an open switch on their left, but the boolean is false and the only other possible situation is that your character would be behind a closed switch, then you’d put an ”else” statement and add the commands: ”moveForward() toggleSwitch()”

Logical Operators are a feature you can add to your boolean to make the code more specific for your character. There are 3 logical operators I learned. One was the ”NOT” operator, which in code reads as ”!” Another was the AND operator, which in code reads as ”&&” Lastly, the third operator was the OR, which in code reads as ”II” These operators are supposed to change the boolean in a specific way. the NOT operator you’d use right in front of a boolean if you want your character to follow your set of commands if the boolean you proposed is the opposite. For example, “if !isBlocked ( moveForward() ) This would read as, if not is blocked ahead, move forward. The 2 other operators are the AND and the OR. The AND operator is used if you want your character to follow your set of commands when both situations are true. For example, if you want your character to collect a gem and toggle a switch when they’re on a gem and a switch, you’d use it that way. the OR operator is used when you want your character to follow your set of commands if at least one boolean is true.

Computer Tech Post #4 – Learn To Code: Commands

This week in Computer Tech, we have just begun to start using the coding app, Playgrounds. We did the Learn To Code tutorial on commands in which Byte has to successfully complete a task by following the commands you give him. Byte is the orange, alien-like creature on the right of the screenshot.

When coding, you have to be very careful because one wrong step makes the entire thing collapse and off-task. Sometimes, when I was doing this tutorial, Byte would move 2 steps instead of one because of a mistake, and then he’d be doing something totally different than what I wanted him to.

A good strategy to use when coding is going step by step. To make Byte successfully complete a task, before I started coding, I made a route for Byte in my head and then put the pieces together one by one, following those steps. It was very helpful and this way there weren’t as many errors.

Here are the steps for Byte to collect the gem andtoggle the switch using the shortest route:

a. Move forward

b. Move forward

c. Move forward

d. Collect gem

e. Move forward

f. Move forward

g. Move forward

h. Move forward

i. Toggle switch

Although coding is a bit time consuming, I think it really improves your problem solving skills and creativity.