Hi! Welcome back to my blog. About a week ago we learned about Adobe Spark. Adobe Spark is a learning platform were you can make all different kinds of images and videos. It has so many different options that you will definitly be able to find one that you love. They have hundreds of templates and even ones where you can start from scratch. But enfore of talking about how great Adobe Spark is im going to tell you my experiance. First I wanted to design an image so I found the instagram post template. I added text and three images and there I had it. After I decided I still wanted to play around with Adobe Spark so I made a video from scratch. Both of my creations turned out amazing and I had so much fun making both of them. So here they are:
Hi! Welcome back to my blog. If you have read all of my other blog posts on my Rube Goldberg you would understand how much effort came into this. Me and my partner Lily went through all of the design process stages. We researched, sketched, Built, Tested and finally reflected on our Rube Goldberg. Along the way I think I’ve learned a lot about the design process especially about the testing step. It takes a lot more patience then I realized. We had to persevere when things got hard. (which was a lot of the time) I will continue to use what I have learned about the design process for my further science projects. I hope you learned with me through this crazy process. So that wraps up my final Rube Goldberg post.
Hi! Welcome back to my blog. Today on my Rube Goldberg I worked on testing it. Let me tell you a lot of aggravation and frustration went into this step. It took 75 tries in total. By the 50th try Me and my partner we’re lost. we didn’t know how to fix it or what to do to improve it. We thought at one point that we were going to pass out. So obviously we were ecstatic when it finally worked. Locking back I would definitely have tried to relax and calm down so we could find the problem quicker. But in the end we figured it out and had a successful Rube Goldberg with a total of 75 tries. But stay tuned for 1 more blog post on my Rube Goldberg project but bye for now!
Hi!Welcome back to my blog. Finally me and my partner are at the point in our Rube Goldberg were it is time to build it. I have been waiting for this moment for almost two months now. But once we got building it didn’t feel like I thought it would. It was hard and repetitive work. We tried to best plan the steps as good as we could so later we wouldn’t have to find ways to improve it. For me so far this was the most challenging part about Rube Goldberg,that is of course until we got to the testing but I’ll save that for my next blog post. one of the challenging parts of building was when Lily wanted to use everything we used in this sketch but I said we should try to use something else because the sketch was so basic. Stay tuned for more on my Rube Goldberg project but bye for now!
Hi! Welcome back to my blog. Today we will be talking about my Rube Goldberg. AGAIN. Right it never ends! During this project I worked with a partner which you would probably already know if you read my other blog posts. Her name was Lily. We are doing mostly everything together except for the blog posts. Sometimes it can make life so much harder to work with a partner. But my experience this time was completely different. As partner we can help each other if we get stuck. For example one day I was working on one of my other blog posts and Lily came over and saw I was stuck and helped me figure out what to right next. Without her I would not be able to finish that blog post any time soon. Another example of how working with a partner can help you is when we were building I could not get two of the wheels together and she helped me out. One example of how maybe working alone would be better is when you disagree. This happens to all partnerships at one point or another. For our partnership it was during the building process when she wanted to start over so we could do a timelapse I did not because I said we worked too hard to take it apart. Stay tuned for more on my Rube Goldberg project but bye for now!
Hi! Welcome back to my blog. Today we are going to be talking about my Rube Goldberg. Don’t worry we still have a lot more posts to go. In my Rube Goldberg, i’m now at the place in the process where was time to do my sketch. This was one of the hardest things for me so far considering that I am not a very good artist. Lily and I had to decide all the steps and picture how they would fit in, before we even drew them. We also had to decide the placement of each step. We decided to include from the five simple machines a wheel, inclined plane, and a lever. Stay tuned for more on my Rube Goldberg project but bye for now!
Hi! Welcome back to my blog. Today we are going to talking about my Rube Goldberg. First let me just explain what a Rube Goldberg is. A Rube Goldberg basically does a simple task that you could easily do yourself but instead have a complex machine do it for you. Now that you know what it is let me talk about the first step me and my partner had to do for it. I know you must really want to know what it is so i’ll just tell you, researching is the first step. For researching we had to watch videos and just plain old read about Rube Goldberg’s. The two books I read were about wheels and axles and screws. The screws we didn’t end up using because they seemed too dangerous. The videos we watched were all about famous Rube Goldberg’s so yah a little out of our league. But we did learn some very valuable things from research. Like we learned about some cool steps that we ended up using, they include the inclined plane (a book),the wheel, and the lever. So far this project is turning out fun. Stay tuned for more on my Rube Goldberg project but bye for now!
Over the last two weeks my control plant has grown 7 more cm. My experimental is not growing. Like I thought.
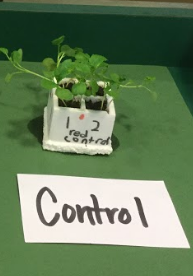
Now my control is 10 cm tall. The color is green. There are 17 leaves and 12 separate plants. One quarter of the plants are drooping but most of them are upright. Most day growth was ½ cm to 1 cm. I think it changed a lot since the start in terms of growth, amount, and direction.
This is my Control quad it is 10cm tall.
I didn’t see any change since the last two weeks. Nothing grew!
My class has been learning about plants. We came up with an experiment to test. I wanted to know if the plant would still grow with pebbles instead of soil. My hypothesis was it would not work because the soil gives nutrients and pebbles don’t give nutrients. I had two plants for this experiment one was a control one was experimental. I gave the control plant everything it needs to grow like water, soil, air, sun, seeds and fertilizer pellets. The other one was the experimental plant, that is the one that I gave pebbles instead of soil. For my experimental plant I did not use soil instead I used pebbles. I am looking to see is replacing soil with pebbles is going to change the high of the plant.
After the first week I am noticing several things. First, my control plant is growing fast! It has 3 separate plants, each with 2 leaves. They are green and 3 cm tall already! The soil is light brown and moist from my watering it daily. Every day the plant grows about a cm. I wonder what will happen next! My manipulated plant is not growing yet. I wonder why?