October 19

Tech #4: The Engineering Design Process

In tech class, we have started talking about the engineering design process. If you don’t know what this is, it’s a process engineers use to build and indentify problems, and solutions to those problems. I have used this process a couple of times, and I have found it very useful. One of the most recent times I have used it was for my Rube Goldberg project in 6th grade Science. The first step is to indentify the problem. In this case, my problem was that I needed to have an easier way to get my chips into my guacamole. The next step is to Imagine and brainstorm ideas. For this part I wrote down all of the different ways I could get the chips into the guacamole. Then I sketched each of the ways to help me visualize how it would look and if it was even possible. I also started brainstorming ideas for the different parts of the machine, leading up to the machine that was going to get the chips into the guacamole. The third step is to Plan and select a solution. During this part of the process, I went through all of my ideas, and picked the one that would make the most sense. I also had into consideration if the machines would be able to “work together”. Once I had picked all of the ideas I wanted to use, I sketched an outline of my machine. The fourth step is to create. First I had to go all around my house to gather the materials I knew, or thought I needed. Then I set up a table and started building, following my sketch. This process took me about 2:30 hours, but I expected it to take me this long since it was a pretty big and long Rube Goldberg machine. The fifth step is to test. This was the part of this project I was dreading. I tested the machine a few times, then I figured out where it was not working. The sixth step is to Improve. When I saw where it wasn’t working, I tried to change or improve that area so it would work. During this part, I jumped to and from steps 5 & 6. Steps 5 & 6 took me about 4:45 hours. The last step is to Share the results. I needed to make a video to hand in the project. This was my way of communicating with my class and teacher, the machine and if it worked.

In conclusion, I think the Engineering design process is very helpful and something people should use when designing something. I personally find it helpful because I like how it helps you structure your building process. I also find it helpful because it tells you what you need to do in each step, very clearly.

October 5

Tech #3: 3D printing- possibilities and impacts

I thought both video were very interesting and helped understand 3D printing better. I think 3D printing has really impacted how we do things and helped us in many ways.

Something I thought was very cool was how doctors have tried to print organs, for transplants. If this worked/works, it could save someones life. If you really think about it, someone might need an organ Asap and if not they might die. A doctor could 3D print one, and transplant it. If a doctor wasn’t able to do this, this person could die if they had to wait too long for an organ donor. If this works it could really impact our medical system because there wouldn’t have to be organ donors anymore, and people wouldn’t die from having a organ that doesn’t work and not having a donor in time.

Another thing that has been changed because of 3D printing is how builders/machine builders get parts they need. For example if a builder needs a small piece and they can’t find it anywhere, they could just 3D print it, so they could keep building their machine. This could also be helpful to the normal human because if someone needs to fix something in their house, they could just 3D print the piece they need, and not have to order it and wait for it to get to their house.

Another example of something that has been affected because of 3D printing is medicine. 3D printing can help doctors come up new treatments or cures for sicknesses. For example, a doctor might need to re-print cells, to help them find the cure for something like cancer. If they are able to do this, it would be a really important discovery and would help doctors in so many ways.

In conclusion, 3D printing has really affected lots of parts of our lives. It has helped make things easier in many ways and could help save someones life. I think 3D printing is something that will evolve and eventually become a way we make things we use everyday, since it is so helpful and you could make almost anything.

September 29

Tech #2: Timber Harvest

Pacific Northwest Logging Video:

One thing I saw that caught my eye was how they stabbed wooden planks on the side of the trees, to be able to get higher off of the ground. I found this interesting because it’s a concept I had never heard of. Something else I found cool was how they had special shoes, to climb up the sides of trees. Something I found surprising was that two people, could cut down a tree, just by using their hands. Another thing that I found interesting and cool was how they had their own little system set up, to do this.  A question I still have is what did the people working there do, to make sure nobody got hurt? In all, I really liked this video and really liked seeing how Logging worked.

Redwood Lumber Industry video:

I thought it was interesting how they would use one of the trees they cut down, to move some of the lumber. When they said that the trees they were cutting, might be as old as our civilization, I was very surprised. I thought the trees wouldn’t be that old. I was also very surprised when I saw the men, being able to cut down trees, with just axes or saws. This surprised me because today, trees are usually cut down with a machine, or an electric machine. These men only did it with the help of an ax or saw, and their bare hands. When they said that the trees were s big, more than 20 houses could be built with one tree, it was hard to believe. I was very surprised to see the logs swing so easily, since the trees are so big. I was confused why they dropped the logs into a mill pond. I thought it was interesting that people in the mill pond, would float the logs over to the conveyor belt. In all, I thought this video was very informative and helped me understand the process of making lumber better.

Start to Finish Logging video:

The first thing I noticed was that this video was more modern. What made me notice this was to cut down the trees, they used a machine instead of having people do it. One thing I didn’t really understand and still have a question about is what the landing area is supposed to do. I found it interesting how chip wood pile would be made into renewable energy. I noticed how they had to prepare the truck, since the pieces of lumber are so big and heavy. In all, this video was more visual which helped see what happens in each step better. I think if there was someone explaining what was happening it would’ve helped my understanding.

Logs to Lumber- An aerial journey through the sawmill:

I was a little confused on what the merchandiser in-feed did. I thought it was cool the machines could do a species analysis, and then the lumber. I thought it was interesting how the machine could tell the species and size of the piece of wood, and put it into the correct bin. I was confused why they would want to take the bark off. I thought it was cool how no part of the lumber would be wasted, how everything would be used. I noticed that there are many steps to the process, so they pieces of lumber are just how the factory owners want them to be. In all, in this video it was kind-of hard to tell what was going on because there wasn’t much description, but I still really liked it because it was very informative.

In Conclusion, watching all of these videos has helped me understand what happens when lumber is made. I liked how the first two were how lumber was made back then, and the last two is how lumber is made now. This really helped me see the diference and how much it has evolved.

September 17

Tech #1: Building

I think building something means you are putting pieces together, to finish off with one product. For example when you build a lego you put lots of pieces together, and then you finish off with whatever you were building. I think building something is like a puzzle. You have lots of pieces to the puzzle, that you have to put together to finish  off with your goal.

One thing I have built is my bed. This was when we first moved into my house and I had to get a new bed, because the other bed I had, broke. I thought building it was actually pretty enjoyable. I think I enjoyed it so much because I was with my mom, and we made it fun by playing music while we built it. I still have my bed and sleep in it every night.

I like building things, but it depends on what i’m building. For example I wouldn’t build something in my free time. On the other hand, I would build something that will give me something I like in the end. For example i’ll build a chair for my room, because that’s something that’s going to come out with a good outcome. I also might enjoy building something, if i am doing it with my friends/someone in my family.

In conclusion building things can be a very useful skill. Depending on what i’m building/who i’m building it with, reflects on my enjoyment.

April 11

Tech #8: My Pendant Making Kit

I’ve really been liking making pendants so far. I got lot of supplies and put them in a box, which i’m calling a kit. In My kit I have wire, so I can actually make the pendants. Lead free solder because solder with lead can hurt your skin. If it hurts your skin, you probably don’t want to use it for jewelery. I have round nose pliers so I can shape the wire. I also have a pair of cutting pliers so I can cut the wire. Then I have double sided tape so it’s easier for me to follow my sketch and so my pieces don’t move while I solder. I have diffrent tips for my soldering iron so I could change the tip if I needed to. Lastly I have a soldering iron so I could solder my pieces together. All of these supplies have been very helpful  to make my pendants.

I miss school a lot, and hope we will be able to go back soon. I’m kinda bummed that we won’t be able to make flashlights in tech, because that’s the project I was looking forward to.

Until my next blog post, Bye!

March 31

Tech #6: Using Nearpod for E-learning

Yesterday we used nearpod for our e-learning. I liked nearpod better than Edpuzzle because it just worked better for me. Yesterday we learned about static Energy. the lesson started with a video of Mr Calvert explaining what we were going to be learning. Then you had to press on a link to actually go into the nearpod. The whole lesson was a video of Mr Calvert explaining something, and then an open ended question. This lesson was my favorite so far because nearpod worked much better for me, and I found it a lot more interesting.

Until my next blog post, Bye!

March 31

Tech #5: E-learning So Far

In tech this week we have been doing e-learning, since school is canceled because of the corona virus. We’ve started a new unit that’s about atoms. To start learning about atoms we used a website called ed puzzle. Ed puzzle is a website that lets you answer questions while you watch a video. I thought Ed puzzle was a cool website.  Some things I have learned are that atoms are too small to be able to be seen with only our eyes, the parts of atoms and lots of other things. Here is a diagram of an atom that helped understand the parts better:

When I watched the first video, atoms were confusing, but after I have watched all 3 videos I understand the topic better.

Until my next blog post, bye!

February 27

Tech #3: Starting to Build our Automatas.

Hello and welcome back to Rocio’s world. Today we’re going to talk about starting to build our automatas.

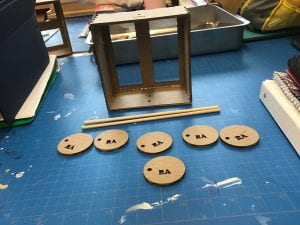
This week we started to build our automatas. So far I have glued all of the prices of my box together, have my cams printed and have my cams on my piston. When I was working on my project I burnt myself with the hot glue gun, but I’m fine. Something that I realized I had to change is that I had 2 cams glued together, instead of 3 and I realized that was too thin, so I glued another one.

Here are most of the pieces to my automata:

Until my next blog post. Bye!

February 11

Tech #2: Starting Our First Project

Hello and welcome back to Rocio’s story. Today we’re going to talk about starting our first project in tech.

Our first project in tech is that we are making automatas . An automata is a machine that does something simple. Like make a stick spin, make a stick jump or something like that.

Here is a video we watched for inspiration:

My automata is going to be a caterpillar moving around. These are my cams :


I am super excited about this project, and I think its going to turn out very good. Until my next blog post . Bye!

February 6

Tech #1: First Few Days of Tech

Hello and welcome back to Rocio’s Story.

The first few days of tech we mostly used nearpod. On Nearpod, Mr Calvert had a slideshow to help us understand the room more. The first day we learned about all of the machines. Some of the machines that we learned about are the drill press , sauntering iron and the hot glue guns. The second day we learned about all of the safety rules  Here is a poster with all of them.

Some of the rules we learned about are that you need to be cautious with the sauntering irons, to report all scratches and burns and that you need to tie your hair back, and no dangling jewelry.

We also learned why you need to wear safety glasses. We saw a video of someone who got a drill stuck in his hair. This is the safety glasses case:

I’m excited to see the next things we are going to do in Tech. I will probably write another post next week so, until then. Bye!