How It’s Made – 7th Grade Tech

For the past couple of weeks, as well as working on our projects, we’ve been learning about physical properties.

After watching a video on how marbles are made from the “How It’s Made” YouTube channel, I observed a couple of things about glass’s ductility and moldability and how those properties can be affected by temperature.

To make a marble, you need to melt glass. I observed that when the glass came straight out of the furnace, it was very ductile. You could apply tensile strength to it and it would deform, it would stretch, but it wouldn’t break. I also observed that it could be easily molded into a shape that would hold.

This video not only taught me how marbles are made, or how glass is very ductile and moldable, but also how a physical property of an object can change depending on the temperature. When glass is not melted, it’s not ductile or moldable at all. However, when it is melted, that’s a different story.
Building My Drawer – 7th Grade Tech

Earlier this week, we began to build our projects! We were given bags with all the necessary tools, opened up our 3D models on our iPads, and then got to work!

I was handed 3 planks of balsa wood to start off. First, to make the bottom face of the drawer, I cut a 10 and 1/2 inch piece from one of the planks using the mini saw because I was cutting across the grain. To double layer it, I cut another 10 and 1/2 inch piece from the plank. Before gluing them together, I needed to make one of the 10 and 1/2 inch pieces 1/8 of an inch shorter in order to make the rabbet joint. Just as I was about to cut 1/8 of an inch off, the bell rang. That meant we had two minutes left, so we had to start cleaning up. We didn’t have much time to start building, but I think I made pretty good progress.

I can’t wait for tomorrow! We’ll probably continue!

3D Project Model – 7th Grade Tech

Last week, we made a 3D model of our projects on Tinkercad. It was a really cool experience!

Tinkercad is amazing! I was able to make the drawer exactly how I wanted it. My design had the same dimensions and everything. At first, I thought it was going to be pretty challenging, but it turned out, it’s not as hard as it seems. Anyone can design anything they want!

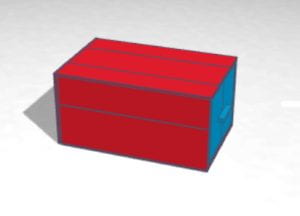
I started off using 4 boxes to make the bottom face of my outer box. I changed their length, width, and height to mimic the balsa wood planks. To make the rabbet joint, I took 2 of my planks and made them 1/8 of an inch shorter. Then I grouped the larger planks with the shorter ones. After that, I attached both groupings using the joint. I still wasn’t done with that face yet, though. I needed it to be 7 inches long. It was 6. So, I made one of the shorter planks another 1/8 of an inch shorter. I used 2 more boxes to make the 1 inch long grouping and made one of the planks 1/8 of an inch shorter. I then attached that new grouping with the other one. Now I finished that face! To make the top face, I just duplicated the bottom one and raised it 5 inches. To make the front, back, and sides, I used the same procedure, and then did the whole thing over again to make my inner box. Now it was time for the finishing touch. To make the handle, I used 1 more box, made it much thinner and longer, and then attached it to the front face of my inner box.

I loved using Tinkercad and thought it was a great way to plan out our projects, especially the joints. I’m looking forward to building my drawer after break!

Here is my design:

Project Diagram – 7th Grade Tech

Yesterday, we planned out our projects and made a diagram. Our projects have to be made out of balsa wood, so I chose to make a drawer. In the diagram, we have to include the dimensions, types of wood joints, and how many 36” long x 3” tall wood planks we’re planning on using.

My drawer is going to be 7” long, 10.5” wide, and 5” tall. I’m going to use rabbet joints, and I’m planning on using 7 planks of balsa wood.

Here is my project diagram:


Sawing – 7th Grade Tech

A little over a week ago, in tech, we used slice precision cutters to cut through balsa wood. You use them to cut with the grain. These tools don’t cut fully through the wood though, we’d have to snap the piece into two like a Kit Kat. This was just so that we learned how to use them.

Last Tuesday, we used mini saws instead of slice precision cutters. Unlike the slice precision cutters, these saws have over two hundred teeth, can cut fully through the wood, and you use them to cut against the grain. At first, I used the saw like a knife and pressed down on it, but when using this type of saw, you’re not supposed to do that. You move it back and forth, letting the teeth do the job. When I tried this, it was much easier and the saw cut through the wood smoothly.

I really liked testing these two tools out and I’m excited to start using them for projects!

Slice precision cutter:

Mini saw:

Timber Harvest – 7th Grade Tech

Back in 1947, we didn’t have the technology we have today. Many steps in the process of harvesting timber were done manually. In the second and third videos, which were about how it’s done currently, almost every step was accomplished using machines.

I learned a lot about redwood from the first video. I was surprised, I didn’t know that they’re so big, and that they can live for so many years! Coast redwood can live up to 2000 years, grow up to 300 feet, and have up to a 20 foot base! The video also mentions another type of redwood that’s bigger and can live even longer! Redwood trees are really incredible.

Something that I found interesting was that it looks like the types of trees we used changed over time. In the first video, redwood trees were used, but it looks like in the second and third videos, smaller and thinner types of trees were used.

These videos showed me the evolution of harvesting timber.

6th Grade Tech – Post #9

This week we finished our blueprints and started building our flashlights! Unfortunately, the quarter’s over next week, so I think that this is our last project.

I finished gathering up all of my fittings, cutting out my pipes, and drilling holes in for my LED light and switch to go through. Also, while I was waiting my turn to solder my circuit, Mr. Calvert let me decorate it. I used red, blue, and black. Now it’s very unique.

I didn’t get to finish soldering my circuit together. This is because it was challenging to figure out which wire should provide a pathway for the negative charge and which wire should provide a path for the positive one. All of my wires are red, so that’s what confused me. The wire that’s supposed to have the negative charge has to be black and the wire that’s supposed to have the positive charge should be red. I think that I should really listen carefully when Mr. Calvert is giving directions so that I don’t have a hard time with something that can be easy.

After finishing my circuit, I will be able to accomplish the last step! That is, inserting it into the flashlight. I hope it works!

This is my flashlight so far:


6th Grade Tech – Post #8

For the first few days of this week, we practiced making blueprints by using a measurement table, t-squares, rulers, and right triangles. It was really fun.

On Friday, we started to make the blueprint for our flashlight design. I’m almost done with mine. After that, I can start to build! I think the hard part about this project is making the blueprint, but when you start to build, it gets easier because you have the steps right in front of you.

I’m going to use one pipe and three fittings. Once I’m done making the flashlight, I am going to decorate it. I think that decorating it makes it more unique. Although, I don’t know what I’m going to decorate it with yet.

I forgot to take pictures, so I’ll make sure to add some in next week. I really need to remember to take pictures each week!

Here is my blueprint of my flashlight:

6th Grade Tech – Post #7

Yesterday, we played the “Self-Driving Car” game. It was pretty fun, but also kind of challenging. It was challenging because when you are the driver, (the one who closes the circuits), you are timed to see how fast you can go. You also get recorded on how many mistakes you make, so you always have to be looking at the cards. That was distracting me from flipping the right switch because if I’m not looking at the right switch to flip, I flip the wrong one.

It turns out that my table mates also had a hard time as the driver because they would make some mistakes and take very long to go through the deck.  I got the fastest time, but I made two mistakes. One of my table mates got a pretty fast time and no mistakes. She got about 50 seconds. I got about 39.

The other jobs were not hard at all. One was flipping the cards and the other one was timing the driver and keeping track of their mistakes.

Next week we will begin to make a blueprint for our new project, which is building a flashlight. The challenge is that the flashlights that we make have to fit in a small box. I already have an idea of what I’m going to make and I know that it’s going to fit in the box. This is because I measured the parts that I think I’m going to be using, and then measured the box. It fits in perfectly.

I can’t wait until next week, and I’ll keep you posted!

6th Grade Tech – Post #6

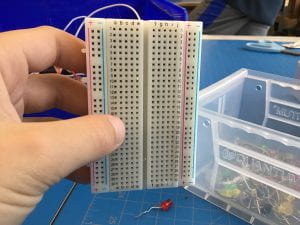
It turns out we didn’t play the “Self-Driving Car” game this Friday. Instead, we made the switch that our projects are going to be connected to on a breadboard. For the switch, we used a breadboard, jumper cables, a battery, and an LED light. This is a breadboard:

In class, we learned about parallel and simple circuits. In a parallel circuit, if there are multiple lights, and one of them goes off, the rest of them stay on. In a simple circuit, if one light goes off, then the rest of them go off too. That’s because of how the switch is built. In a parallel circuit, the wires attached to each light are connected to the wires that are attached to the battery. And each wire that is attached to a light is separated from the other wires. That’s why if a wire attached to a light gets cut off, then that light will go off, but the others won’t. Here are some pictures of the three different switches all put together: