Capstone #3

Hi, I promised to keep you posted, so I am back! A lot has changed since my last blog post. Basically, I already finished my Capstone. You are probably wondering, “What Jane how is it already done and why didn’t you blog about it?!” Well, in my situation, I haven’t shared it yet, but I finished my movie.

If I haven’t already mentioned this, capstone gives you three ways to present. First, Ignite, which is 3 minutes. After last year’s traumatic Ignite scene, I was definitely NOT doing Ignite. Second, there was a TED Talk, which is 3-5 minutes. Like ignite, you have to memorize the scripts and TED Talk.’ But, there is a twist. I do not like memorizing, so I did a movie. A movie is 3-6 minutes long and has no memorizing because it is a movie. I chose that, of course. (Same with the other half of the class)

Poor lonely Ignite.

Anyway, after I interviewed my expert, I had to take all my research and notes and create a script for my presentation about it. That took a long time, which is why I haven’t posted in a while. The script was the most challenging part because I had to create the script with my narration plans, photo plans, and slide timing. After I finished my script I made my movie on Adobe, which was very fun. I chose Adobe because We-Video (The other way to present if you did a movie) was too complicated, and Adobe is very clean and simple.

One annoying and challenging part was how my movie came out over time so I had to edit it, and download it-which takes 5 minutes-FIVE TIMES. Anyway, after I finally fixed my movie, I uploaded it. And here I am!

Overall, I am so excited to share my movie, and I am very happy with the final result. Researching about Sunsets and Sunrises was very interesting and challenging, and I learned a lot. Now that the era is finally over, I just want to say, thanks for staying with me.

Rube Goldberg #2

Rube Goldberg Process:

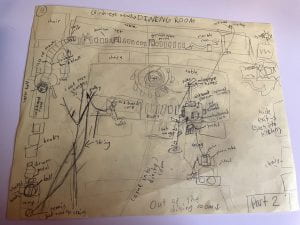
A lot has changed since I did my first blog post and sketch about the Rube Goldberg machine. First of all, I was having problems with my sketch and build design, so my sister and I decided to combined and work together in our dining room. The dining room had a good, closed-in space with enough hard floor, and surfaces. This was perfect for our build.

The problems at first were building the first part of the build. We didn’t really know what to expect, and it was hard to figure out what would work. Natalie and I knew that we could incorporate many simple machines, especially pulleys. Some other simple machines we had were incline planes, wheel and axles, wedges, and one lever. We soon decided our simple machine would start with someone pulling a rope and our simple task ending by pouring water and food into cat bowls.

My success at first was getting materials. It turns out we had much more than we needed and we didn’t really need to buy much, besides a few pulleys and dominos. With a little help from my mom, we had already gotten more than halfway through the build on Saturday. We built it by testing each little section and making sure it works, then putting them together.

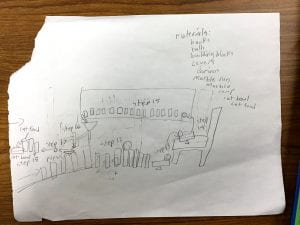
My first sketch was not very useful anymore so I decided to make a new one after we could scope out the new build design. I liked it way better than my first one, and it was laid out well. The next day we finished and tweaked up the build, and then we had to test it. When the build was finished, it had 16 steps in all, with more than 6 simple machines.

The problem afterward when we were testing was that we realized some things didn’t exactly work in the slightest way. At first, the bouncy balls going into a cardboard tube, in the beginning, got stuck, so we had to get smaller ones. Second, we had to re-do all the dominos with a spacer because it wasn’t spaced correctly. A lot of the angles were re-put and spaced out. When we got onto our 9th try we realized that in the ending when we added weight on one side of the pulley it made the other side not pull down. To fix this, we had to even out the weights by putting magnets on the cars, (The first side of the pulley,) and then taking away some food and water.

My successes were that it worked! In the end, we got it correct on our 10th try. We got many good recordings and explanations for our we-video in the future. Overall I had a great experience building and planning the Rube Goldberg. It was very fun and exciting and I learned a lot.

Here are my final sketches!

We-Video Process:

My We-video was a rushed and short, but complicated process. Natalie and I finished our Rube Goldberg shortly after we planned a way to put our videos, photos, sketches, and everything together cleanly. In the end I am very proud of what we have accomplished and done. It’s the end of the era!


Rube Goldberg #1

My class and I have been recently starting a major process on a Rube Goldberg project. A Rube Goldberg machine is a complex build that causes a simple task, like flipping a light switch, opening a door, etc.

My problems in the start were how I was really stuck in the beginning. I had no idea how I was going to start my sketch for the build and the materials I needed. My first plan was making one with my sister, which would be hard because there had to be double the steps in the Rube Goldberg, and I had a hard time getting along with her. We decided on making the last part of our Rube Goldberg – the task that the machine has to complete – fill a cat bowl with food. My sister said my part had to fill a water bowl, which I didn’t want.

Though I did have some successes. I soon later found out I had a lot of useful materials for the build like dominos, cars and car tracks, building blocks, balls, and many more things. I also am good at drawing, and very creative so I was confident in my sketch.

I was feeling confused, and it was kinda overwhelming with so much to do, but I was pretty excited.

Later I had more problems. My sister and I were not working together well and we had a bunch of quarrels. We were fighting over if it should be in the basement or not, which I think it obviously should. We have cats, and the basement has a good space that wouldn’t be messed up – my cats are not allowed in the basement. – Later on, we ended up leaving each other to work alone. NOW THE BASEMENT IS ALL MINE HAHA.

Anyway, I ended up finishing my sketch after a long night of work and headaches.

I was very frustrated while making my sketch, because I have limited materials, while my sister needs materials for her Rube Goldberg. Soon enough I thought of some ideas, but I’m not entirely sure they will work.

The process is still a work in progress, and hopefully, things go well.

Here are my Rube Goldberg machine sketches!


Maglev #2

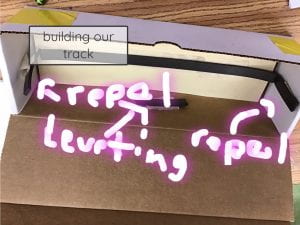
My group did fantastic! We did lots of experiments, and tries and we were doing very well. We used mostly strip magnets and 2  donut magnets, with tape. We used the strip magnets on the track like a track, and we put the donut magnets on the wall of the box.


On the train car we put only strip magnets on the bottom of it, lined up together with the magnets on the track. The strip magnet made the train car levitate, because the strip magnet was facing north and the train car was facing north, so they were both repeling each other.   


We actually did not really fail, but some stuff was very tricky. One of the things I thought was tricky, was when our group’s train car was not levitating and we did not know why.  We made lots of changes and we succeeded. It was so fun and I did learn really cool things. And when we tried the tricky stuff, we would think of ideas to do instead. 


I’m hoping to make better changes for my next design, and work better and do better. And if my group and I do better, we can have more fun, and learn more! 

Maglev # 1

A maglev train is a train that is repeling from its tracks. ( Like a magnet ) My groups idea was, we should tape a magnet to every side of the train track, except  that on the sides of the train that is facing the train the magnets are repelling the train.


  We tried that out and it… Worked! Two other times we tried it did not work, but this time it did! We used these magnets: strip magnets, donut magnets, and circle magnets.


 When we tried to make the maglev train the first time, of course, did not work but we improved the train and then it work we did.(: we tried moving the magnets. And it did not work then, so we knew that the last time worked! It was so fun!

Electromagnet VS permanent magnets!

I learned that electromagnets are different than permanent magnets. Example: electromagnets are only magnets when something is attached to it from a wire. But permanent magnets are permanent. So they are always a magnet. Like when you try to attach paper clips to an electromagnet that is not attached to a battery, (or something) then it will not attract. If you try and attach a permanent magnet to a paper clip it will attracted!! That’s an example of how an electromagnet and a permanent magnet are different.


The questions I have are here: How does a permanent magnet, start as a magnet? Why don’t a electromagnet, start not a magnet, and a permanent magnet does? Why do magnets not attracted when they are both facing the same side? And those are my questions. (:

The Science Experiment

I had a science experiment!!! We did a very fun thing.We worked with our science team, we made a bolt into a magnet. We used a bolt, an electromagnet, a battery, a  insulated wire, a battery holder, and at the end, we used paper clips.

So first we took the bolt and raped the wire, on the bolt. Then we took, the extra wire and attached it to the battery, ( the battery is in the battery holder. ) Then we took paper clips and attached them, to the battery to test them to see if the bolt was a magnet. And my team made a… Magnet!!!!!!

Then the class had a challenge, we had to try and attach 10 paper clips to the magnet!!!!! BUT my team attached 23 magnets! It was so fun!!!!

I learned that you can use a battery to make a peace of metal that is NOT a magnet, into a magnet!!! ( It was so fun. )

What I Learned About Magnets

I learned that magnets have two sides. One side is North, the other side is South. If the North side is touching  another magnet on the South side, they would stick together. If the South side is touching another magnet, but the other magnet is also facing South, then those two magnets will not stick together. In fact those magnets will try and push away from each other.

And magnets can be very strong, they can be so strong you can’t pull them of from sticking to each other. ( but those are just SOME magnets not every magnet. )

And that’s a few things I learned about magnets!!! And also we did a fun activity with magnets. Each table had a stations that had to do with magnets. One station ( my favorite station ) was about iron dust, like in the photo.

And other stations were testing magnets, and building magnets, and lots of cool stuff!!!!! But at the end when we were cleaning up, some people were cleaning and some people were not. But still, I had a fun time and it taught me a lot of cool stuff!!!!!