3D Project Model – 7th Grade Tech

Last week, we made a 3D model of our projects on Tinkercad. It was a really cool experience!

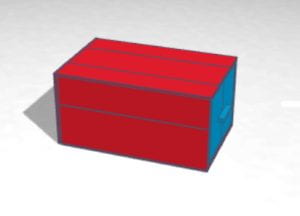
Tinkercad is amazing! I was able to make the drawer exactly how I wanted it. My design had the same dimensions and everything. At first, I thought it was going to be pretty challenging, but it turned out, it’s not as hard as it seems. Anyone can design anything they want!

I started off using 4 boxes to make the bottom face of my outer box. I changed their length, width, and height to mimic the balsa wood planks. To make the rabbet joint, I took 2 of my planks and made them 1/8 of an inch shorter. Then I grouped the larger planks with the shorter ones. After that, I attached both groupings using the joint. I still wasn’t done with that face yet, though. I needed it to be 7 inches long. It was 6. So, I made one of the shorter planks another 1/8 of an inch shorter. I used 2 more boxes to make the 1 inch long grouping and made one of the planks 1/8 of an inch shorter. I then attached that new grouping with the other one. Now I finished that face! To make the top face, I just duplicated the bottom one and raised it 5 inches. To make the front, back, and sides, I used the same procedure, and then did the whole thing over again to make my inner box. Now it was time for the finishing touch. To make the handle, I used 1 more box, made it much thinner and longer, and then attached it to the front face of my inner box.

I loved using Tinkercad and thought it was a great way to plan out our projects, especially the joints. I’m looking forward to building my drawer after break!

Here is my design:
Computer Tech Post #4 – Learn To Code: Commands

This week in Computer Tech, we have just begun to start using the coding app, Playgrounds. We did the Learn To Code tutorial on commands in which Byte has to successfully complete a task by following the commands you give him. Byte is the orange, alien-like creature on the right of the screenshot.

When coding, you have to be very careful because one wrong step makes the entire thing collapse and off-task. Sometimes, when I was doing this tutorial, Byte would move 2 steps instead of one because of a mistake, and then he’d be doing something totally different than what I wanted him to.

A good strategy to use when coding is going step by step. To make Byte successfully complete a task, before I started coding, I made a route for Byte in my head and then put the pieces together one by one, following those steps. It was very helpful and this way there weren’t as many errors.

Here are the steps for Byte to collect the gem andtoggle the switch using the shortest route:

a. Move forward

b. Move forward

c. Move forward

d. Collect gem

e. Move forward

f. Move forward

g. Move forward

h. Move forward

i. Toggle switch

Although coding is a bit time consuming, I think it really improves your problem solving skills and creativity.

6th Grade Tech – Post #4

Yesterday, we started to solder. It was so fun! I got to finish melting the metal, but I didn’t get the time to get my design off the double-sided tape.

And today, when I started to roll it off, guess what?! It broke! I think it was because I didn’t melt enough solder on those specific parts. Well, the good thing is that, it was possible to re-solder it. After I soldered it again, it broke AGAIN… which was very frustrating.

Then, for the third time, it finally came out great. I hope that the next designs I make won’t brake when I roll it off the tape. I’ve learned that I’ve got to wait a couple of minutes before taking it off and that it has to be done extremely carefully.

Here are some pictures…

This was before I soldered it:

This is when it broke the second time:

And this is how it turned out after the third try:

Rube Goldberg – Post #4

Yesterday in class, we had a sketch museum. We rotated around the classroom looking at other groups’ sketches and writing on post-its what we think they can work on and what we really liked about them. I really enjoyed seeing other people’s work. A lot of people had at least one simple machine in their sketch. Most people used an inclined plane. Inclined planes are probably the easiest simple machine to use in a Rube Goldberg, so that’s probably why a lot of groups are using it. I also saw that most of the groups used dominoes. Maybe it’s because dominoes falling is a pretty cool effect. They fall fast and make a kind of original sound.

I saw one sketch that had a step similar to one of ours, which is probably our most complicated step. That step is to make a computer call a phone by making something hit the enter button on the computer. The phone’s vibration makes it slide down a mini ramp and knock down dominoes which then set off something else. The other group’s Rube Goldberg starts out by them calling a phone which vibrates down a ramp and sets off something else. I thought the sketch museum was great and I really want to see how everyone’s machines turn out.