Tag Archives: Maglev train.

Maglev Train

 Final Design Process Reflection


By: Milo

Group members: Jordan, and Dylan


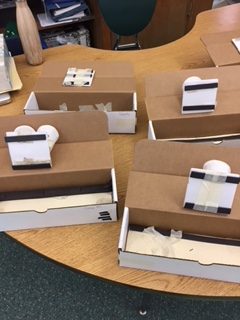
The materials our group used at first was two long strip magnets, masking tape, 4 north and south magnets, and two short strip magnets. Our groups first design was putting about two layers of long strip magnets layed down on the bottom of the track on the right and left side. On the train we put two short strip magnets on the bottom of the train.

The first problem we had was the train was not levitating high enough. Our groups solution was putting five long strip magnets on each side of the track. When we tried it again it held 55 marbles.                                                                                                                                                                       

Our last design was putting about seven layers of long strip magnets on each side of the track. On the train car we put two short strip magnets one on each side.

I felt nervous, and happy. I felt nervous when it was our turn to show how strong are train was by putting marbles in the cup that was taped to the top of the cup. I felt happy when our car was able to hold 82 magnets.

Final Design Process Reflection

Final Design Process Reflection

By: Reese

Group members =  Luke.P, Lorenzo.

My groups track was made with 3 ring magnets 6 long strip magnets then 2 little strip magnets. Our train was made with 4 little strip magnets 1 ring magnet 2 north/south magnets.  We arranged the track by putting the 6 long strip magnets on the bottom of the track, the ring magnets on top of them and the 2 little strips on the sides repelling. We made the train with 4 short magnets on the edges and one ring magnet in the middle.

Our first problem that we figured out was it did not levitate. We wondered why, so we double checked that everything was on the right side and it was. Then we figured it out everything needs to mirror meaning everything needs to line up.

Our final design worked and we were happy. It worked because everything was repelling and mirroring. For our track we used 3 strip magnets. We arranged it by having the 3 strip magnets lined up with a little space in between. For our train we had 3 short strip magnets. We lined them up by doing the same thing like we did on the track, we left a little space in between each of the short strip magnets.

One  of my thoughts during the project was frustrated. I was not frustrated because my team couldn’t come up with the design but I was because we kept trying and nothing worked the way we wanted, it just wouldn’t  levitate. Another felling of mine was excited. I was excited because I wanted to know how many marbles our train could hold!! The 3 felling I felt was nervous. I was nervous because I was thinking is this idea going to work or will it fail.


Maglev Reflection

By: Kabir    

Members: Peyton,Kyle,Eden

We taped 5 long strip magnets to the track we put the magnets horizontally. For the car we cut a short strip magnet into 4 pieces and put them in the corners and put another short strip magnet in the middle of the styrofoam train.

We faced the problem that the train and the track where not a mirror image so we had to change both of them to make them a mirror image so the car floated higher.

Our final design was two long strip magnets in the corners for the maglev track and for the car we had two short.

A feeling that I felt was frustrated because the train and the track weren’t working. It was not working and when it  finally worked excited and very happy when it was done.


Final Maglev Design Process Reflection

Final Design Process Reflection  

By: Brady

Team Members: Sammy and Sofia .S

For our first track design we used eighteen ring magnets and for our car design we used five disc magnets. We arranged our ring magnets in the track by making four squares and putting one magnet inside each square. For our car we placed our magnets in a square with one disc magnet in the square.  To hold everything in place we used tape by making little loops and putting the magnets on top.

One problem my group faced is that the disc and ring magnets weren’t letting the car move across the track and . We think it was attracting because the car wouldn’t move across the track. The sides of the magnet must’ve attracted but we needed it to repel. To solve our problem instead of using ring and disc magnets we used strip magnets. We used two long strip magnets and two short strip magnets.

For our final design we used strip magnets for our car and track. For our car we used two short strip magnets. For our track we used two long magnets. We arranged our magnets by putting the long strip magnets on each side of the track one on each side same for the car but with small strip magnets. We lined the magnets on the car and the track up so they can match and the car can move along the track.

While my group was working I felt excited a little because I wanted to see if it would work and I felt frustrated because we tried so many ideas but most of them weren’t working. When we finally got it to work  we got excited. I thought at first that this was going to take forever.