Archive of ‘6th grade’ category
This passion project was a great experience. However, since we were not in school because of the virus, I had to do things a little differently. Today I am going to show you the pros and cons of not being at school while doing this project.
One pro is that I can research and choose my own time to do my work. This is nice because some days I might want to work in the evening, and some days I want to work in the morning or afternoon. I can also choose how long I want to work for. If I was in school, I would have at most fifty minutes in school at the same time everyday. Working at home also means I have access to other resources. For example, my phone, or my parents could help me. I think this is nice because sometimes the teacher doesn’t know the answer to your question, but at home I have a lot more people to help me. One con is that sometimes I might not know how I am supposed to do something. In school, I have a designated time where I can go to class, and ask any necessary questions, and there is also extra help. At home, if there are no zooms that day, I will have to send an email, and sometimes I wont get a response for a while.
One thing that I have learned because I am not at school is that I have to be much more independent. When I’m at school, it is so easy to just ask questions without thinking if I actually know the answer or not. Now that I am at home, I have to answer questions on my own, so this really helps me become much more independent and makes me more of a problem-solver.
In summary, I think this project was very different, and it was much more difficult to do at home. However, this project also allowed me to grow and learn.
Here are the sources I used!
The Chemistry of Food and Nutrition: By Duncan A. W. (Book)
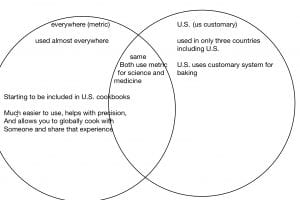
• “The History of the Metric System- Baking with Scales- food52” https://food52.com/blog/19615-scales-make-baking-easier-so-why-are-they-not-embraced-in-the-us (website)
• “The science behind cupcakes” – Yuppiechef Magazine https://www.yuppiechef.com/spatula/the-science-behind-cupcakes/ (website)
• “Chemical Reaction Involved in Making a Cake” – Sciencing https://sciencing.com/chemical-reactions-involved-baking-cake-7173041.html (website)
• “Chemical Changes: Crash Course Kids #19.2”-https://www.youtube.com/watch?v=37pir0ej_SE (video)
• “ALL ABOUT LEAVENING | baking soda, baking powder, yeast, and steam” – https://www.youtube.com/watch?v=g2DbJ-lKcE8 (video)
• “WHAT HAPPENS WHEN YOU PUT CAKE BATTER IN THE OVEN?” – Cake Chemistry http://cakechemistry.com/what-happens-when-you-put-cake-batter-in-the-oven/ (website)I
you can also use this link to see some more of my note-taking!
https://my.noodletools.com/web/bibliography.html
In my last post, I talked briefly about my final project. Today I am going to go more in depth about it and talk about the process!
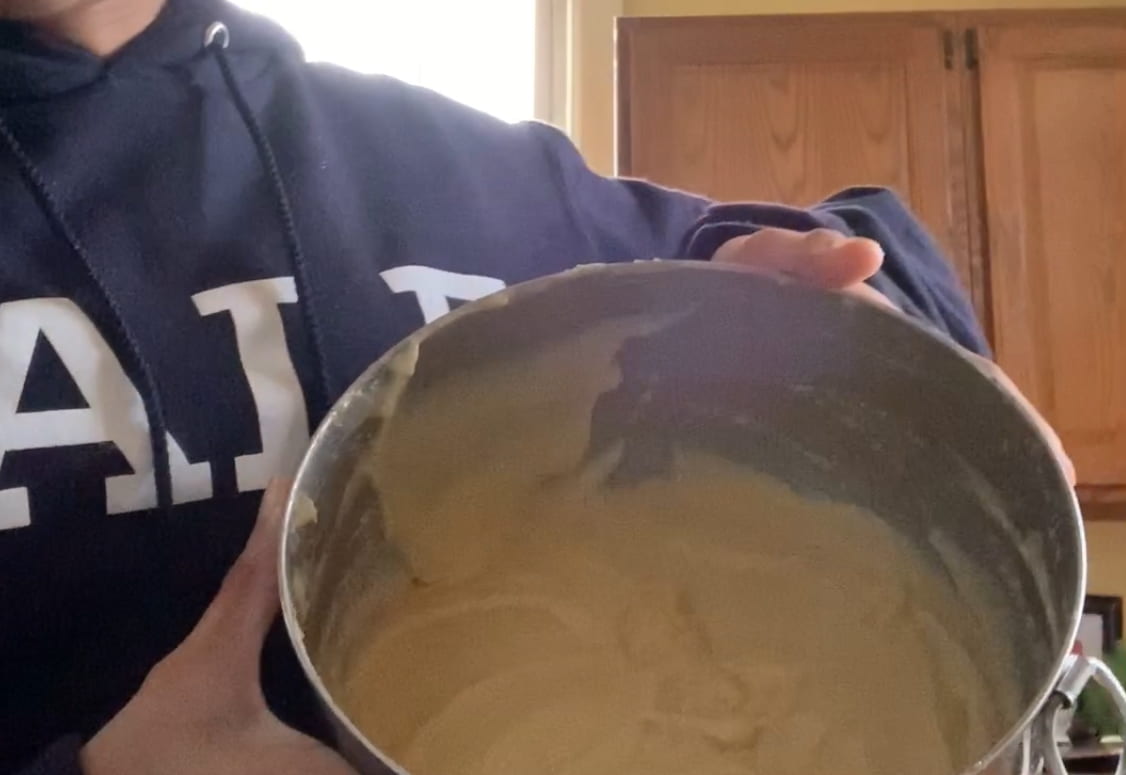
One big thing was that since it was my own recipe, I did not know how well it would turn out. My family and I did not have enough ingredients to make a test batch, and we didn’t want to go to the store because of the virus. This meant that I had to just go with the original recipe. This was a little problematic, but because of my research I was pretty confident it was going to work. My recipe was for vanilla cupcakes. As I started recording, everything was going pretty well. Sometimes, I would have to take multiple;le tries on a video clip because I would mess up. Ai kept my script behind the camera so I could occasionally look at it without it being very obvious (look at last post for my script and recipe). However, there was one problem I ran into while baking. I had left my butter sitting outside to thaw. I could have left it out longer, so when I went to cream my butter and sugar together, it was a little difficult. In my video, I said that it was okay not to cream it completely if your butter is not soft enough. After I added the eggs, milk and vanilla, when I was done mixing, I noticed there were small little butter pieces left since it wasn’t melted. This was okay since it would melt once baked it. Another problem I ran into was that the batter got too thick. To solve this problem I added another 1/4 cup of milk. Even though I had some issues, the cupcakes turned out great! I really liked them, but there were still a couple changes I would make to my recipe.
After I was done making the cupcakes, it was time to edit my video. I had a bunch of clips that I had to put together, so I decided to use IMovie. After I added all the clips and made sure they were in order, I noticed in total the video was twelve minutes. Like I said in my last post, I decided to watch it and see where I got bored. I also noticed that I was stumbling over words a bit in some spots, so I cut that out. Sometimes I also added information that was not important or necessary. After editing for a while, I managed to get it down to ten minutes, which was the goal.
Here are some photos from my experience! (edited recipe, and photos from of me baking!)


This entire project has been such a good experience. Not only was it fun, it also helped me learn so much. I am so sad it is done! I hope you also learned something as well, thanks for following my journey through this project!
So far, I have finished my research and my final project. While it has been an overall success, there were a couple obstacles in my way that I experienced. Today, I am going to talk about them!
One struggle for me was writing the script. This was so hard because I had a lot of information, and I didn’t know what information I should include in my final project. I wanted to give important and fun facts, but I didn’t want it to get boring. In order to solve this problem I decided to look through my research and see what would help me explain why we are doing certain things. I thought that this was important because I could tell everybody why we are doing this step in the recipe and why it is important. One other thing I did to help is ask the question: “What would interest me?”. One thing that I thought was important to put in was the stages of the batter in the oven because I found that cool and interesting.
After I filmed my video for my project, I realized that it was 12 minutes long. I think this is very long, and people will lose interest if it is that lengthy. I am still working on how to cut it down. My goal is to get it down to 10 minutes or less. I want it to be short, but also make sure that all the important information is in it. To fix this problem, I have been watching the video and noticing where I have been getting bored. If I am getting bored, I will go back to that part and either get rid of it or cut some of it out. This method has been very helpful.
To summarize this project, I would say it has been a good learning experience. I think I had a lot of fun, but it also helped me learn how to fix some of my issues or struggles.
Here is my script and recipe:


Through this research process not only have I learned lots of facts, I have learned a lot about myself and how I work and note-take.
I have learned a lot throughout this process, and it showed me what I am like as a learner. One big thing I realized is that I like to have everything organized. This is mostly because for me, I understand the research more if it is neat and in order. This is why I have been splitting it up by each specific website or topic. Writing down what website it comes from is important because then I can go back to that link and see if I can find more useful information. I also learned that I prefer videos instead of web sites. I think this is because I understand the information better when I’m hearing it, rather than seeing it.
As a reader, I conclude that I don’t like reading big paragraphs or articles and I have to break the article down in sections. This is because if I read too much I get confused and will mix it up with other information about something a little different. As a writer, I learned that the easiest way for me to note-take is bullets. I like bullet notes because they are simple and quick. If the notes take too long you might leave something important out because there was so much information. If I did have to write down Lon information, usually I would break it down and use other note-taking strategies for each section. Sometimes I would have to write down everything in bullet form because there wasn’t a better way to write it down.
I have learned as a time manager that before I start researching I have to make a plan on what I’m doing and how long I’m doing it for. Usually, I would do one source a day. I had seven sources, so this took me a week to get all of my sources done. Each source would take about 30-45 minutes, but mostly 30 minutes. I think doing one source very day meant I wouldn’t forget anything important or forget a website. Since I am done with all my seven resources, I have to start researching on extra information. I will have about the same amount of time each day answering my questions.
Overall, I have learned so much about myself which will be so helpful for the future in another project, because I know what I like and what works best for me
So far, I have learned so much more about things I have never known before. The research I have been doing is very interesting and fun to learn about.
One of the most helpful note taking strategies is boxes and bullets. Like I said in the last blog post, I think that this is a very broad way of notetaking and can be used in a lot of ways. As I have been continuing my research, I think it is nice for when I don’t know how else to note-take or if it is a very big topic. For example, when I was reading about the stages of the batter in the oven, there were lots of different stages and a lot of information about each stage. It was very hard to use a compare and contrast note-taking strategy, so I chose boxes and bullets. I think writing that way helped me understand it better.
During this process, I have had to change and add a couple of things. One thing I realized was that there were still a few questions that I had after I finished researching. These questions were very important for me to successfully complete my final project. I just finished note-taking on all of my sources, so I will use the next few days to find answers to my follow-up questions. As for all my research, I would say the quality of it is pretty good. I think that I have good research so that when I get to my final project I will know what to do and how to make my recipe for the cupcakes. However, I think that there might be some excess information that might confuse me on what information is important or not.
Overall, I am so excited to do my final project. I can’t wait!
Even though I prefer boxes and bullets, here are some other ways to note-take if you need ideas!:
I have just started my research. So far, it has been extremely fun to learn new things about my topic. Today, I’m going to share my note taking strategies and what I’m learning!
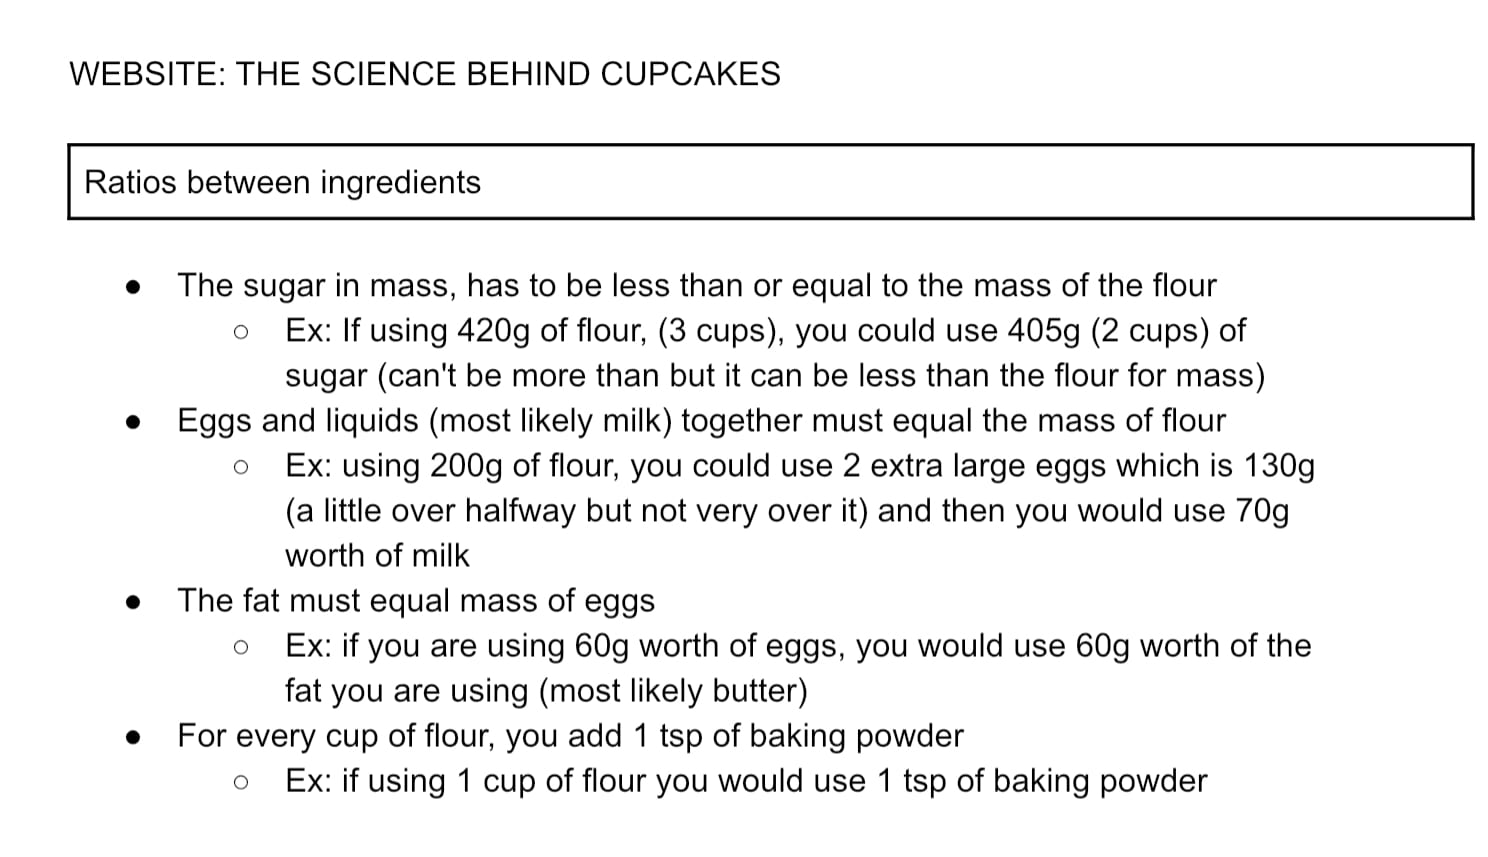
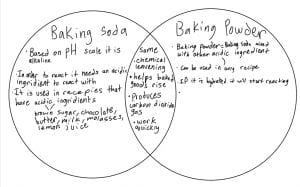
I’ve been researching for that long, but there are still some important facts I have learned to help me for my final project. One thing that is very crucial for my final project is learning about the ratios between ingredients. I found out lots of facts about what ratios are important for baking. After all, you can’t just make random measurements up for each ingredient when creating a recipe. One example of something that I learned is that for every cup of flour you are using, you use 1 tsp of baking powder. If I was using 3 cups of flour, I would use 3 tsp of baking powder.
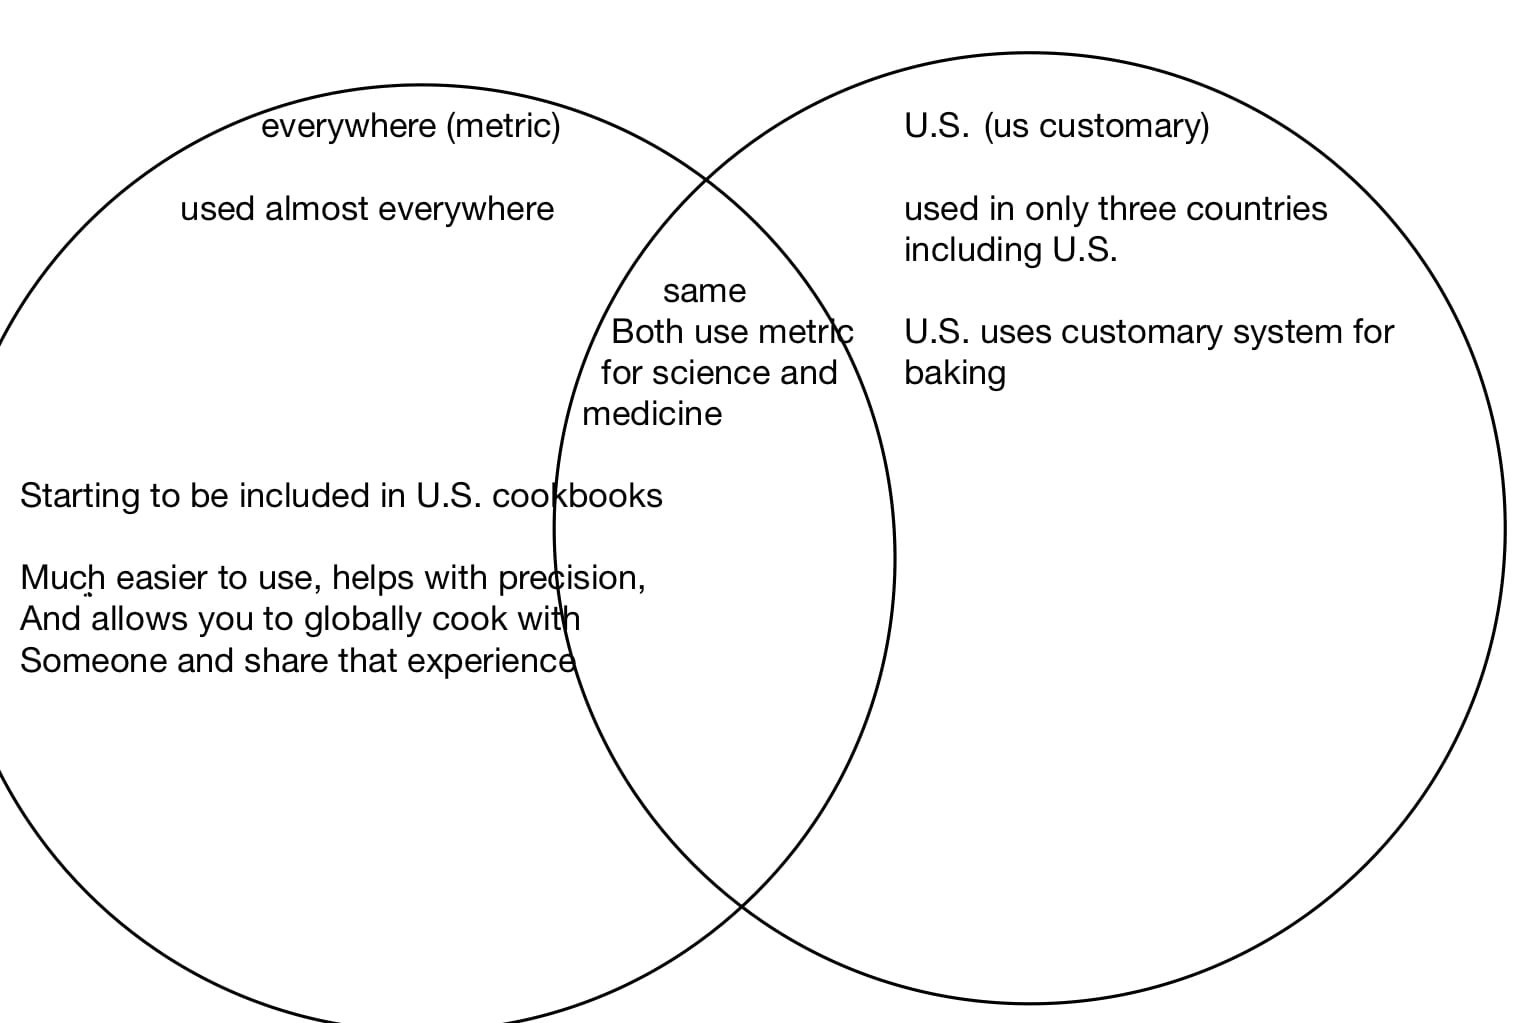
I have a couple note taking strategies that I’ve been using. One note taking strategy I really like is boxes and bullets. I really like this because it allows you to take notes in a more general way. It doesn’t have to be specifically comparing or contrasting, or cause and effect. I think this is a great way to take notes if you are taking notes on a main idea or taking notes on something that has lots of different parts. A note taking strategy I need to work on Venn diagrams. I find these really hard because I am not good at comparing and contrasting because they either are too different or too similar.
In conclusion, I am so excited to keep on researching and find out more interesting facts!
Here are examples of my research:


Today is my last day in technology. Overall, technology has been super fun. I personally love building things, so I really enjoyed this. Mr. Calvert has been such a good teacher. He helped out and taught me so many things like soldering, making switches, atoms, batteries, and so much more. I thought this class helped me with things like building, science, and measurement. I am super sad to leave technology. It was so fun, but I know I will love art as well. This is my last blog post, so I hope you learned about what I did in technology. Bye!
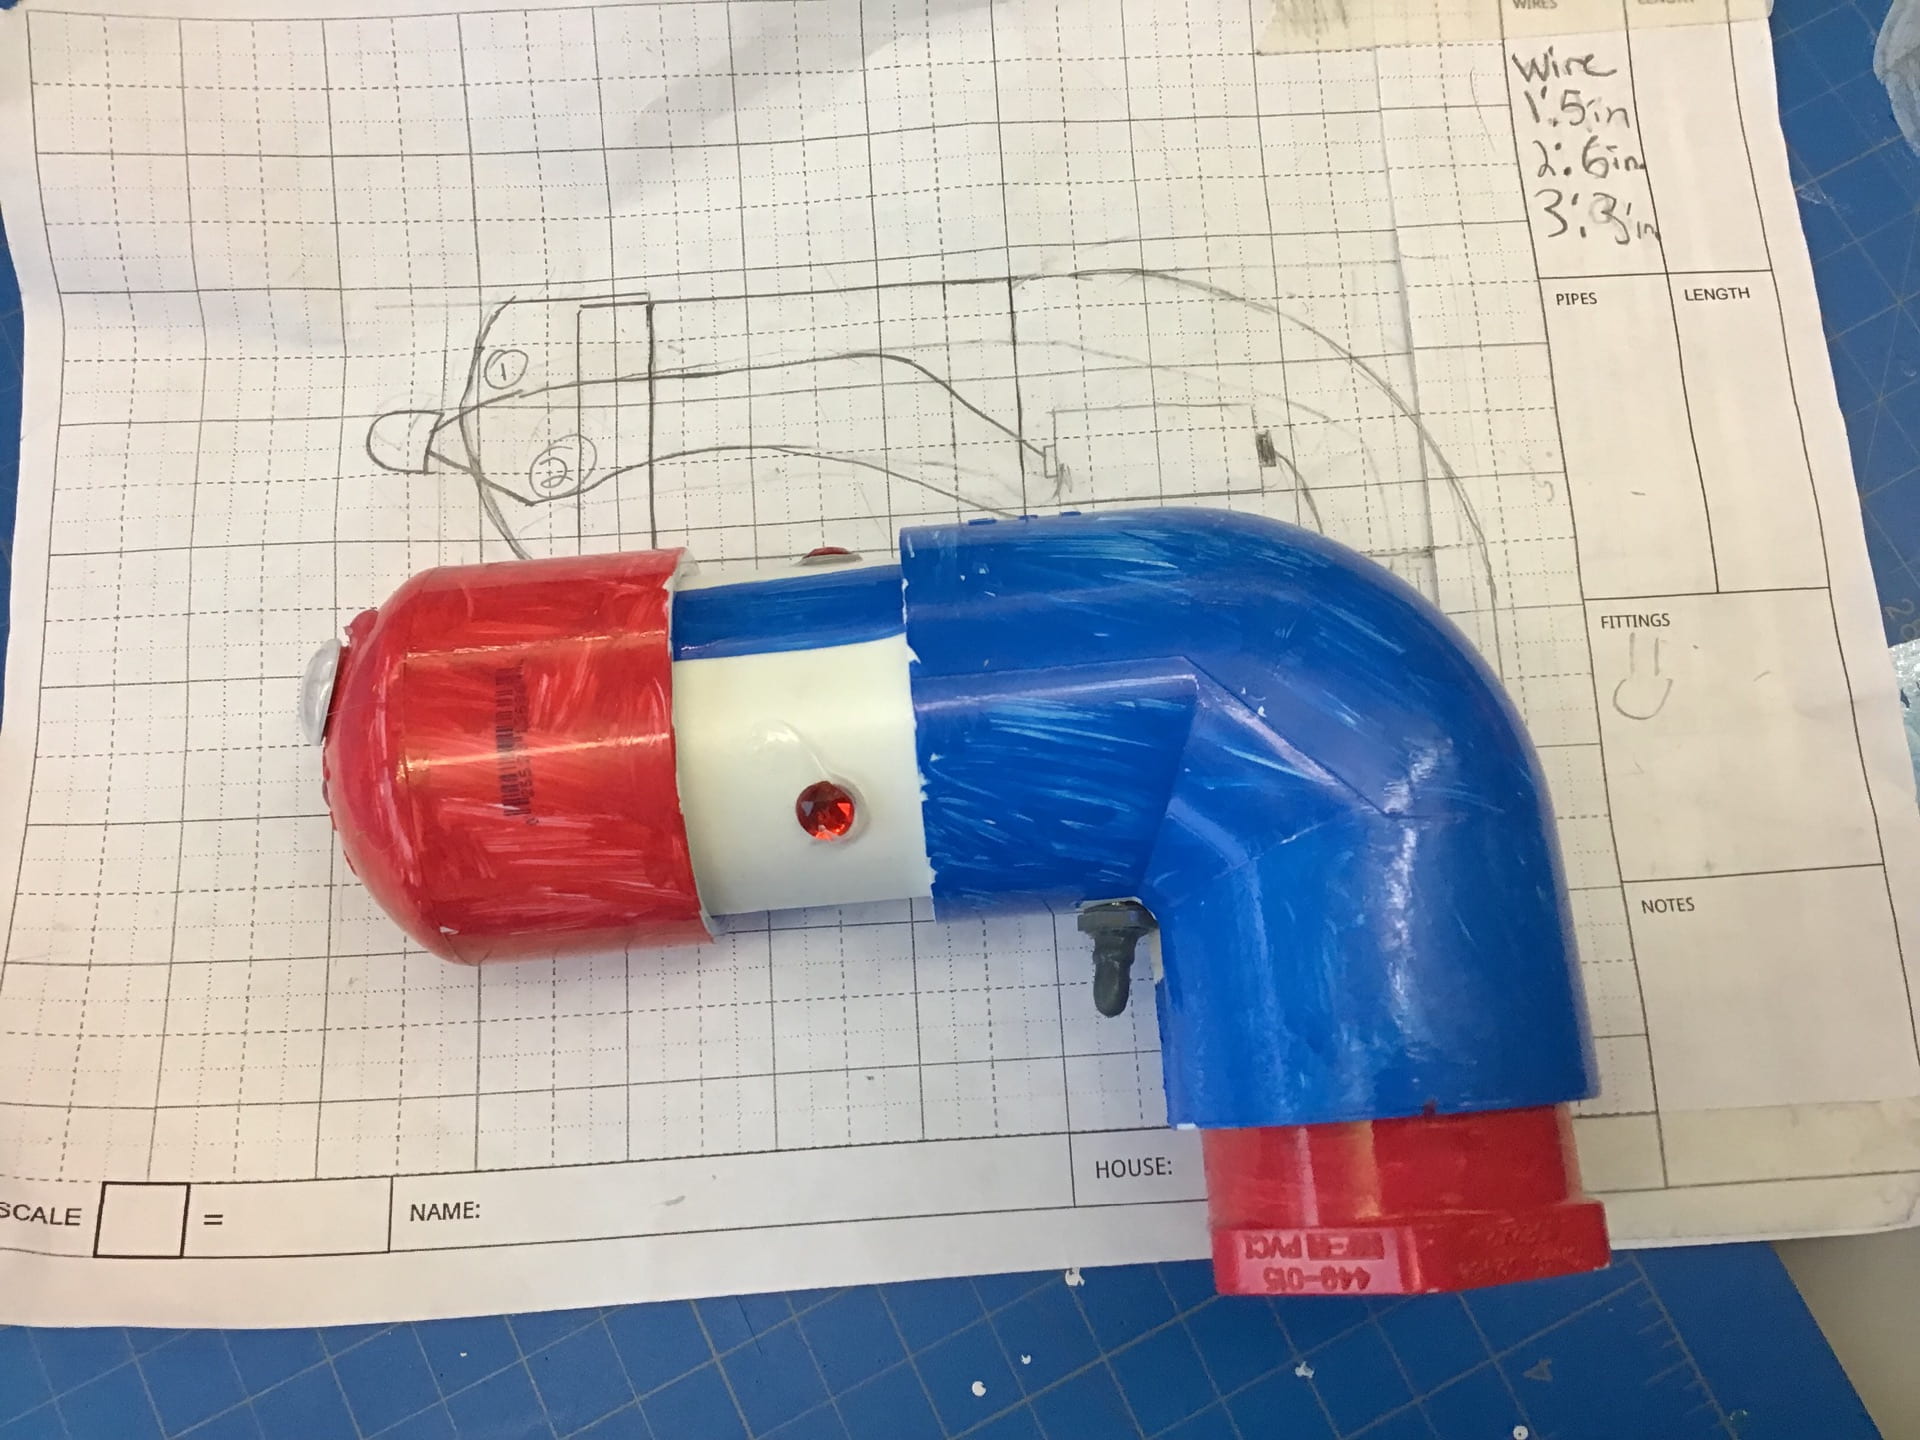
Now that I finished my drawing, it was time to make my flashlight. First I worked on my wires and circuit. Right away I measured my wires. The next thing I had to do was strip my wires. This meant I used a tool and took off the rubber part of the wire. After that, I hooked both ends of the wires that had been stripped. Then, it was time to create my circuit. This circuit was how I made the light turn on. I soldered my switch,battery,and wires all together. 2 of the wires were positive, and both of those had to touch the switch. The other wire was negative, and it was supposed to touch the battery and light. After I made my circuit, I had to cut my pipe. I used a saw to cut my pipes, which was a little scary, but turned out to be pretty fun. I cut it 2 ½ in. To match my drawing. After that was done, I had to drill holes where my light and switch were supposed to go. The bigger drill was for the light, and the smaller drill was for the switch. After I did all of that, I assembled my flashlight. Since I measured everything, it all fit perfectly. The last thing I had to do was decorate. This was to add a bit of personality to your flashlight.
Here is my flashlight:


In technology we started working on flashlights. These were supposed to be made to help the kids in Thailand, who got stuck in a cave. There was no light so they couldn’t see anything. We started to brainstorm designs for our flashlight. These flashlights had to fit in a special box. If not, it is too big. You also have to think what type of design would work best for the kids. After brainstorming, we picked our favorite design and drew it on a new paper. After that, we made a drawn to scale sketch. This was an important sketch because it had all the measurements we needed.
Here is my drawn to scale design: